

How To Use Spring Arm Camera
Locomotion and Perspective
Download the Starter Projection
Layout uses one Master Starter Project. If yous've downloaded it recently, chances are you don't need to re-download it.
This tutorial requires that you lot've downloaded the starter project as of iv/4/16:
- Click here to download the Layout Master starter project.
- Extract the zip folder.
- Open up the Layout_ToyBoxx.uproject and begin your take a chance!
This lesson will introduce characters that move. At long terminal, you can navigate your levels!
Before we begin, it's of import to remember that movement in virtual reality can cause sickness if not washed carefully. Comfort depends on the relationship betwixt grapheme locomotion and camera perspective. A practiced graphic symbol-camera relationship can only come from diligent testing. Wear your headset!
Virtual reality requires us to call back differently virtually movement and perspective. We believe our mechanics adequately mitigate simulation sickness, but there's a great opportunity to introduce here. Don't hesitate to create whatever characters that work best in your experiences.
This talk past Oculus' Richard Yao is a nifty introduction to the perceptual arrangement and HMDs.
The locomotion and perspective mechanics we're going to work with in this lesson are:
- First Person
- ii.5D
- Signal and Click
- Stationary Cameras
First Person
Permit'south brainstorm with simple start-person movement. This character volition move and rotate in the globe freely. The camera volition exist attached in the position of the character's "caput".
We more often than not don't recommend this kind of character motility considering information technology invariably leads to some sickness. We do, however, appreciate that players notice this kind of movement intuitive, then we'll embrace some best practices below.
Simulation sickness is oftentimes the result of conflict between the visual perception of motility and the not-visual perception of movement.
UE4 Grapheme
We can create a new graphic symbol with UE4's Character class.
- Open the Lessons > Lesson4 > FirstPerson > FirstPerson level
- Create a new Grapheme blueprint named BP_FirstPerson
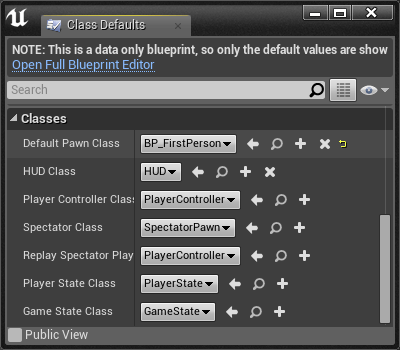
Now we can set up our new character equally the default player grade:
- Open FirstPersonGameMode
- Fix DefaultPawnClass to BP_FirstPerson
- Open BP_FirstPerson
Since we chose Character every bit our parent course, this blueprint comes with a few inherited components:
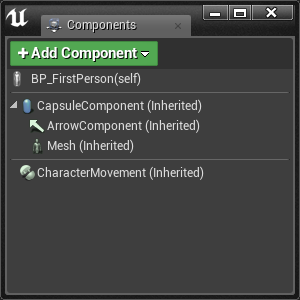
- The inherited CharacterMovement component allows united states of america to hands move our character later adding some inputs and bones movement code.
- The root CapsuleComponent acts every bit our player's standoff box. Information technology's already set to the recommended height of 176cm and width of 68cm.
- We can add together a skeletal mesh to the Mesh component to define the character's appearance and animations.
Let's add together a camera to the character via a scene component.
- Add a Scene component
- Name it CameraRoot
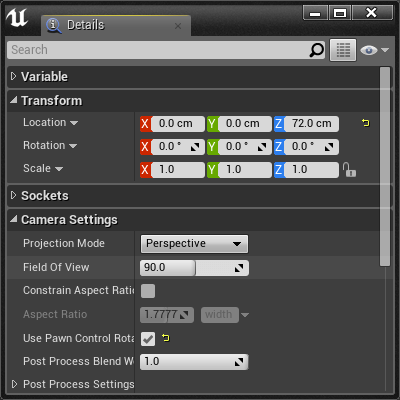
- Set location to [0, 0, 72]
- Add a Camera component
- Check the Use Pawn Control Rotation option
- This option turns the character to face the direction your HMD is facing.
- Uncheck the Lock to Hmd option
- This was introduced in 4.eleven and does not play well with the Utilize Pawn Control Rotation option. We will apply it afterwards in the lesson.
- Attach information technology to CameraRoot by dragging the camera component on top of the camera root component.
- Set location to [0, 0, 0]
- Check the Use Pawn Control Rotation option
The UE4 VR All-time Practices Guide recommends setting the heart height of a showtime person character to 160cm.
The first person character guidelines are written to replicate reality. UE4 recommends the thespian have an average human height, width, and camera (eye) location.
When the level is played, a BP_FirstPerson character will spawn.
Character Movement
We can capture user input for movement behavior with Axis and Action Mappings.
Action Mappings capture binary input, like cardinal presses.
Axis Mappings capture continuous input, like mouse move.
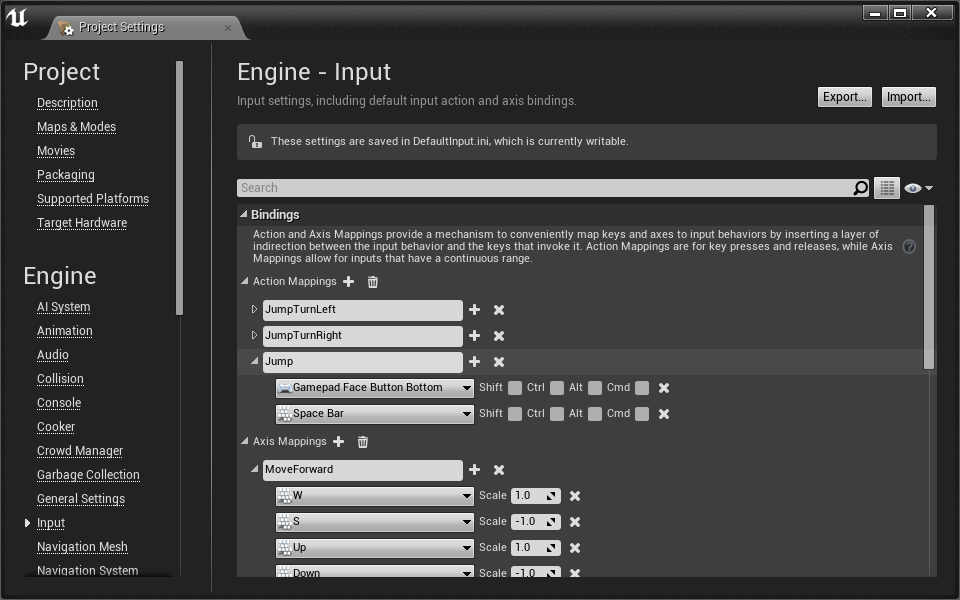
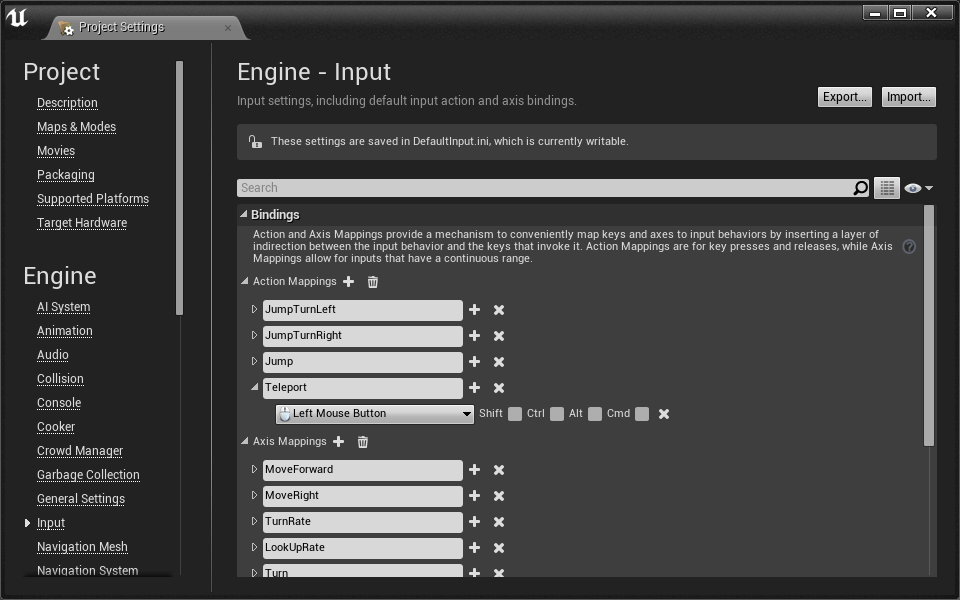
- Open Settings > Project Settings > Input
Our starter project includes some Axis Mappings for simple movement input:
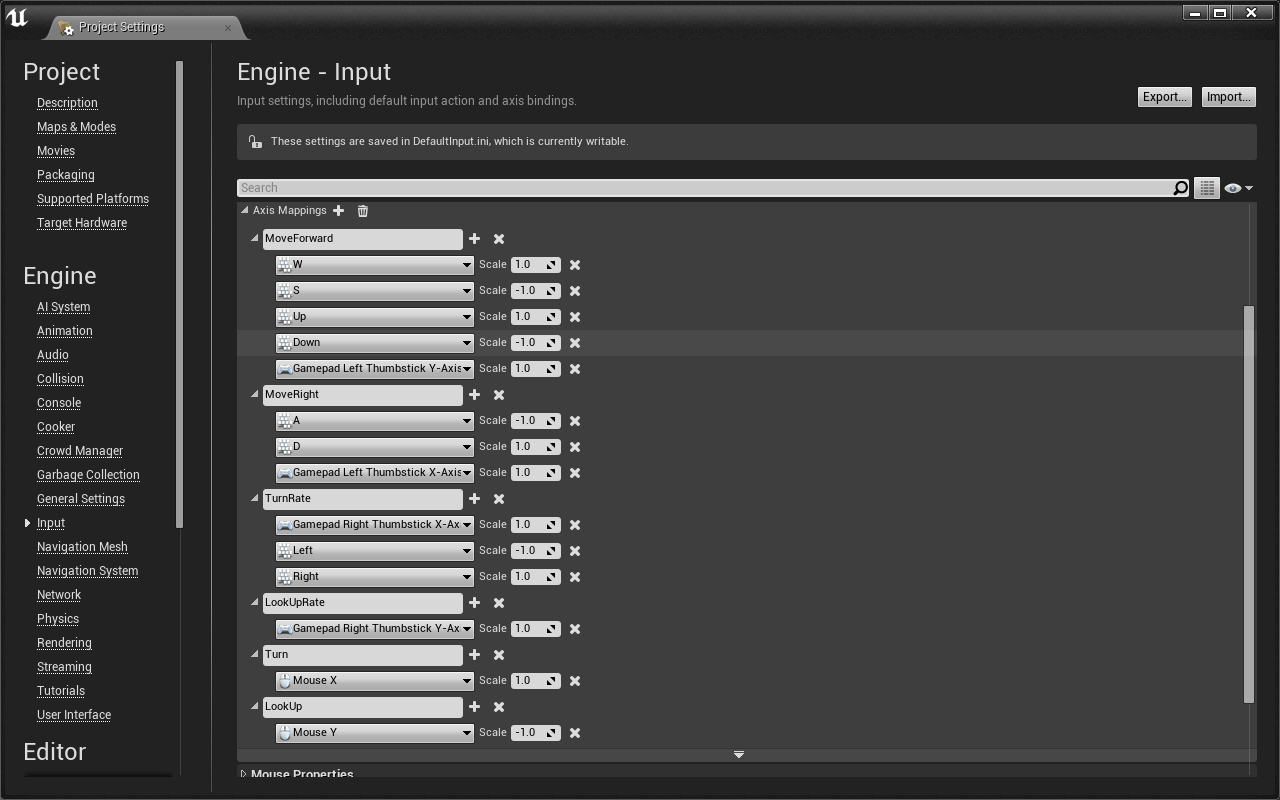
Notice that Calibration is ready to -1.0 for inputs that movement the graphic symbol in the "opposite" direction (in this instance backward or left).
There is an important difference between TurnRate/LookUpRate and Turn/LookUp. Gamepad and keyboard input is represented with axis values between -1 and one. Mouse input is represented with values between ∞ and -∞. We'll handle both types of input in our motion script.
- Open the BP_FirstPerson Event Graph
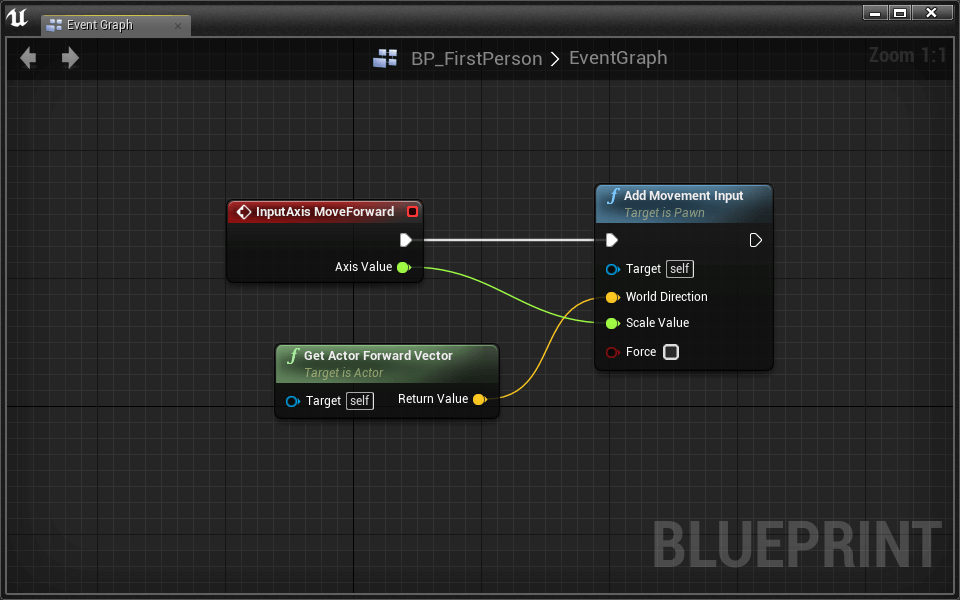
- Place an InputAxis MoveForward event
- Connect an Add Movement Input node
- MoveForward > Centrality Value Add together Motion Input > Scale Value
- Place a Get Actor Forward Vector node
- Get Actor Forward Vector > Return Value Add Movement Input > Globe Management
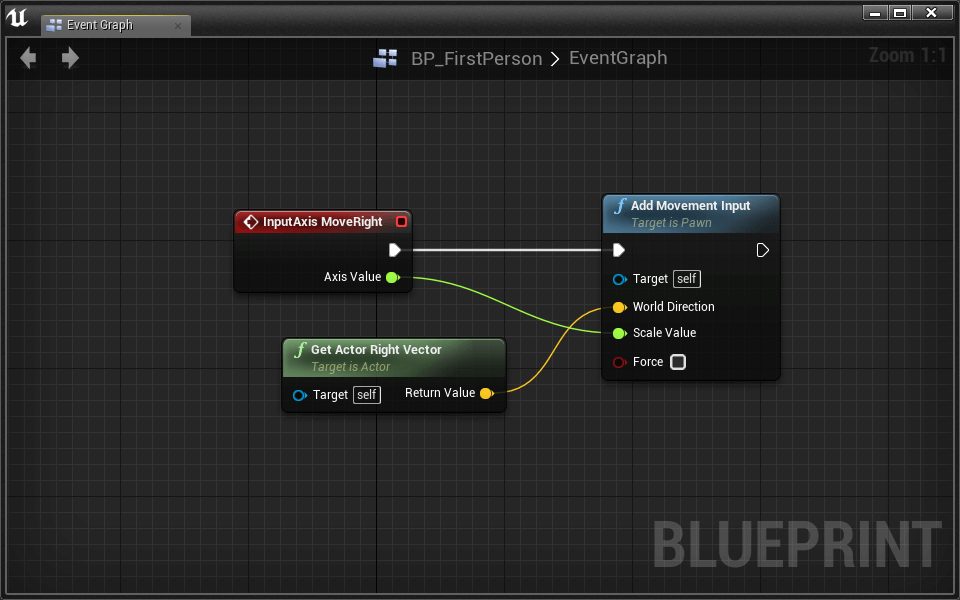
- Identify an InputAxis MoveRight upshot
- Connect an Add Movement Input node
- MoveRight > Centrality Value Add Movement Input > Scale Value
- Place a Become Role player Right Vector node
- Get Actor Right Vector > Return Value Add Movement Input > World Management
The grapheme can now move forrad, backward, left, and right using the W A S D keys, arrow keys, or gamepad left joystick.
UE4 recommends slow movement speed in VR. We tin can prepare a lower speed in the CharacterMovement component details panel.
- Set CharacterMovement > Max Walk Speed to 240
We can set other character movement options in the CharacterMovement details console. We tin can besides set these variables in code.
Let's add together code to allow the player to look up outside of VR.
We'll offset with mouse turning:
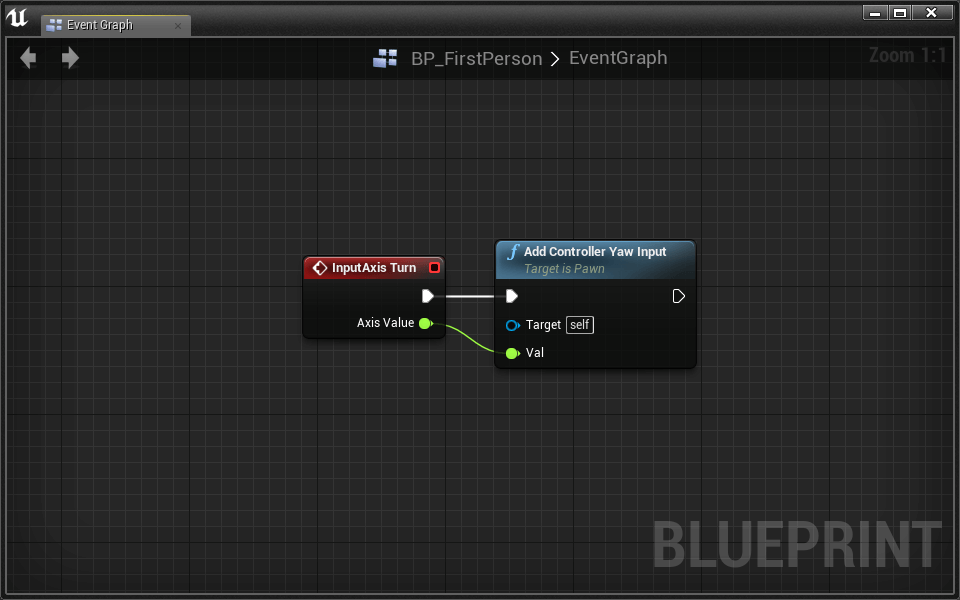
- Place an InputAxis Turn outcome
- Connect an Add together Controller Yaw Input node
- Turn > Axis Value Add Controller Yaw Input > Val
- Identify an InputAxis LookUp event
- Connect an Add Controller Pitch Input node
- LookUp > Axis Value Add Controller Pitch Input > Val
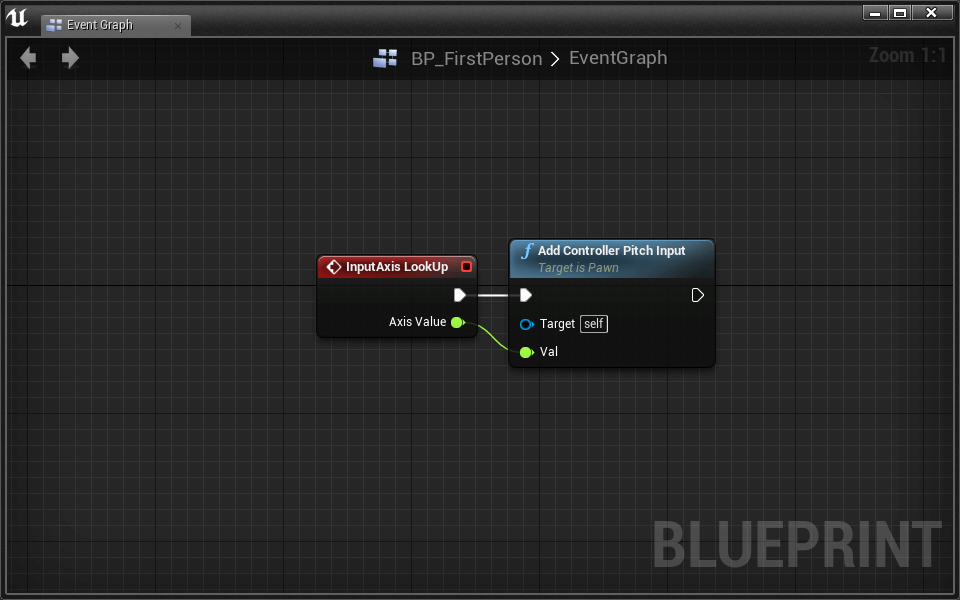
Notice that pitching up and down is automatically disabled for VR comfort.
Permit's enable rotation for the gamepad and keyboard:
- Create two new Bladder variables named BaseTurnRate and BaseLookUpRate
- Set both their default values to 45 (You lot have to compile before you tin gear up their default values)
These variables will exist used to fix how quickly the gamepad and keyboard change the player's view.
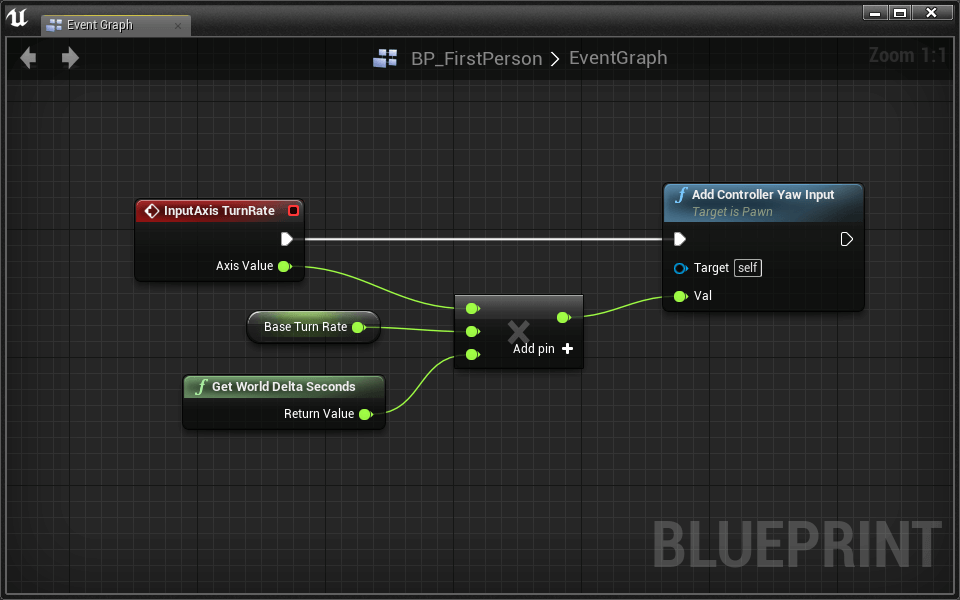
- Place an InputAxis TurnRate result
- Connect an Add together Controller Yaw Input node
At present nosotros employ Axis Value to calculate the amount to plow the player.
- Place a Float * Float node
- Click Add Pin
- Connect TurnRate > Axis Value into one of the multiplication inputs.
- Connect our variable Base of operations Turn Rate into one of the other multiplication inputs.
- Place a Get World Delta Seconds and connect information technology to the terminal multiplication input.
- Float * Bladder Add together Controller Yaw Input > Val
We multiply rotation by Get Earth Delta Seconds so that speed does not change with frame charge per unit.
- Identify an InputAxis LookUpRate event
- Connect an Add Controller Pitch Input node
- Place a Float * Float node
- Click Add Pin
- Connect LookUpRate > Axis Value into ane of the multiplication inputs.
- Connect our variable Base of operations Look Upward Rate into one of the other multiplication inputs.
- Place a Get Earth Delta Seconds and connect it to the last multiplication input.
- Bladder * Float Add Controller Pitch Input > Val
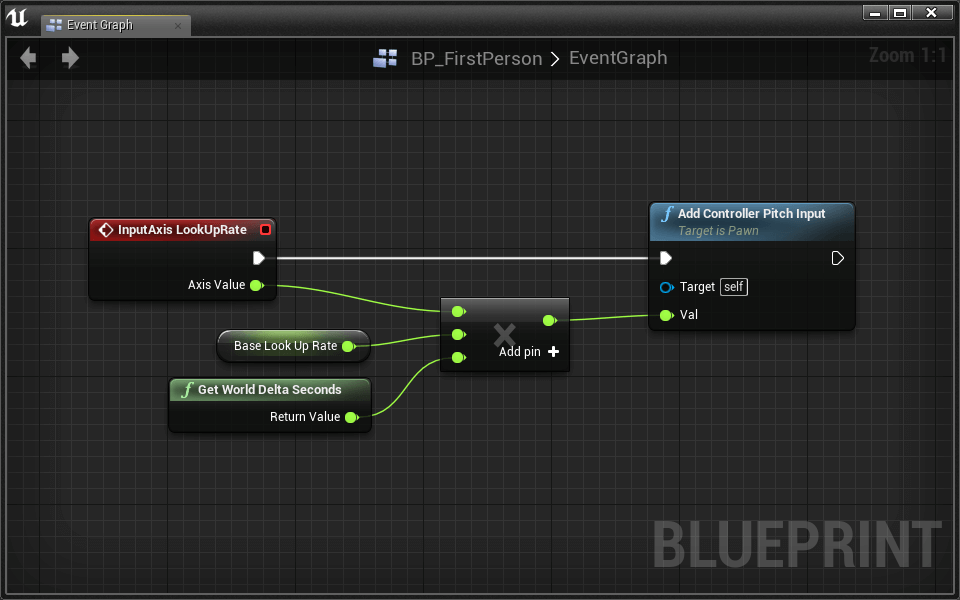
Nosotros at present have full control of the character's motion in and out of VR.
Watch out! You might experience some discomfort when rotating with the mouse or joystick. Some viewers observe that mouse rotation is more comfortable than joystick rotation. Research suggests that the mouse provides a grounded reference that the joystick cannot provide. It's believed that this reference helps the viewer better anticipate and conceptualize orientation. Peachy!
VR Friendly Turning
If the visual perception of rotation causes hurting, we tin just skip rotation with a jump turn. Sometimes called a skip, the jump turn allows the player to rotate in detached radial increments.
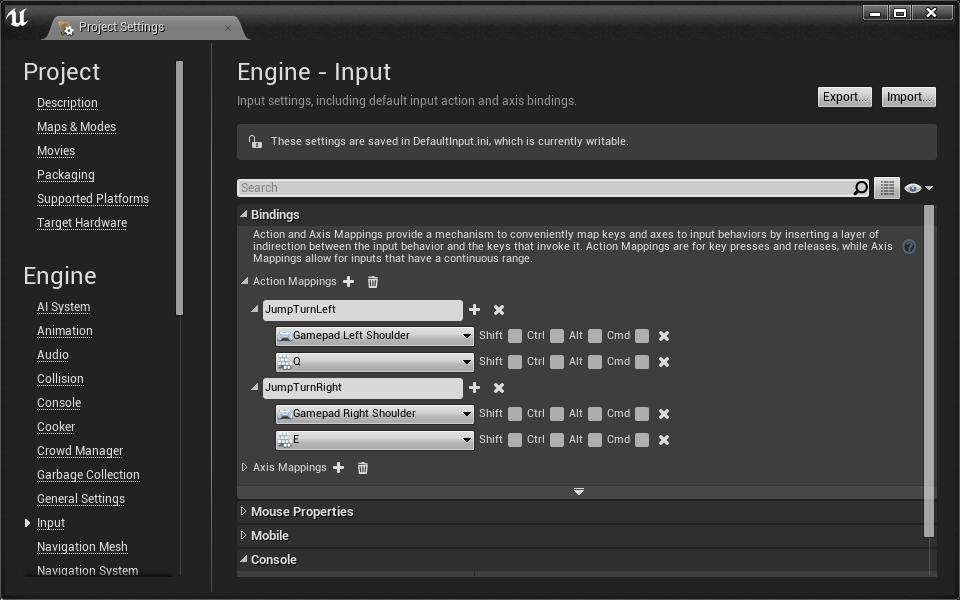
- Open up Settings > Projection Settings > Input
- Review the Action Mappings:
- Open BP_FirstPerson
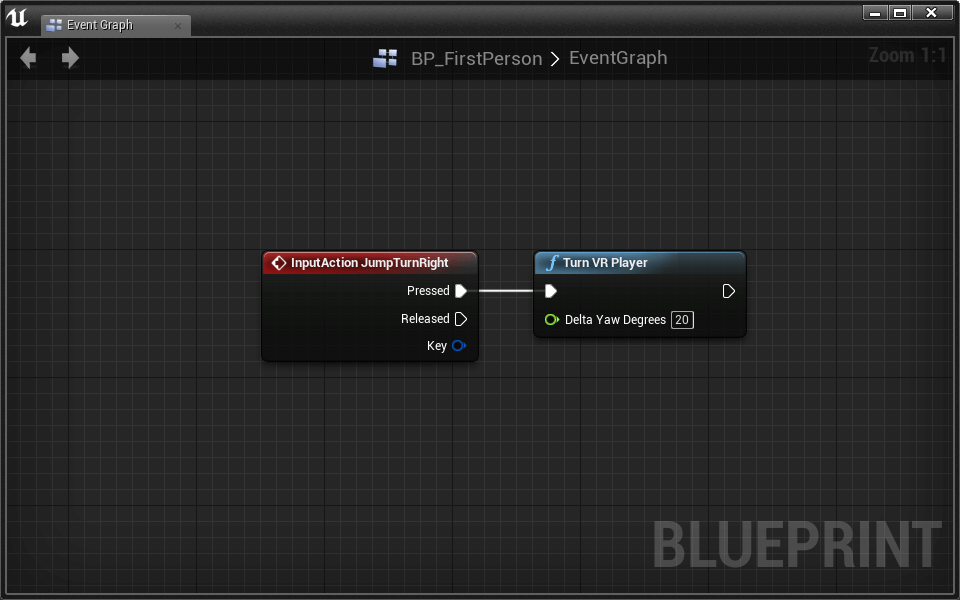
- Place an InputAction JumpTurnRight event
- Connect Layout's Turn VR Thespian node
- Ready Delta Yaw Degrees to xx
- Place an InputAction JumpTurnLeft event
- Connect Layout'south Turn VR Actor node
- Gear up Delta Yaw Degrees to -20
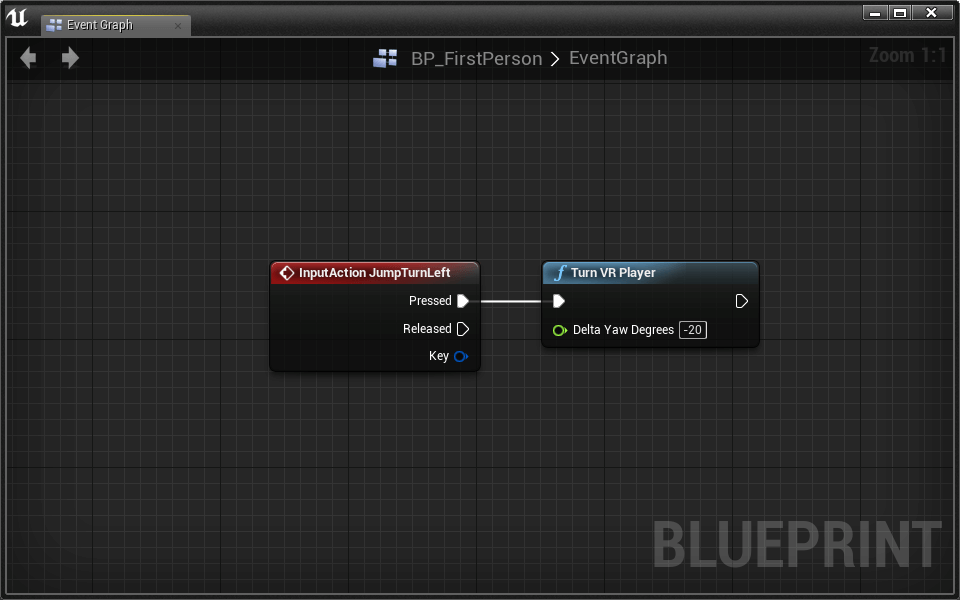
Utilise Q and E or a gamepad's shoulder buttons to bound left and right. Information technology tin take some getting used to, simply many discover the leap helps reduce simulation sickness.
Feel gratis to change the Turn VR Player > Delta Yaw Degrees amount to discover a rotation that feels all-time.
Jumping
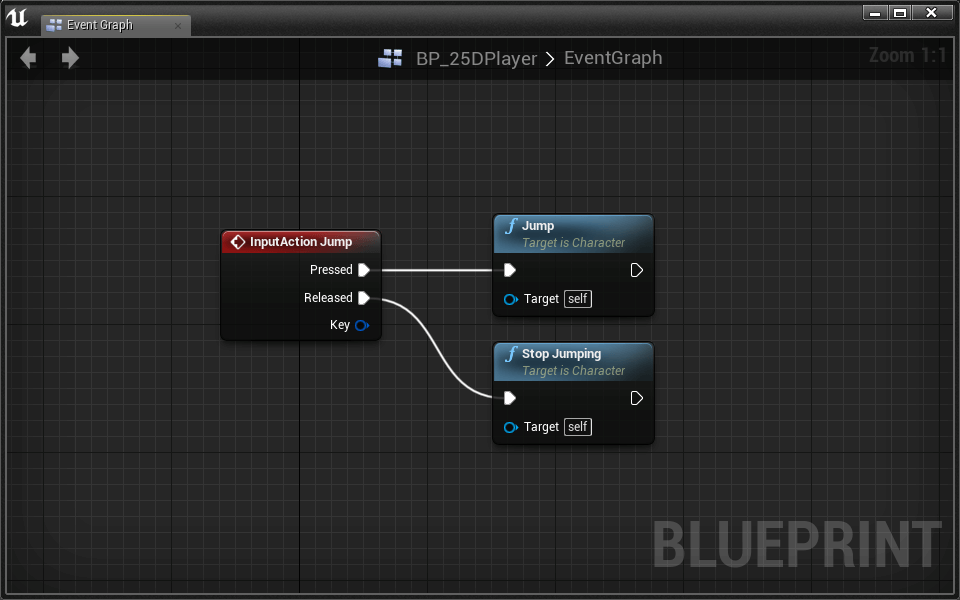
Jumping is generally not advisable for VR, but some experiences phone call for jumps. We've provided a jump action mapping with two inputs: Gamepad Face up Push Bottom and Space Bar.
- Open BP_FirstPerson
- Identify an InputAction Jump result
- Place a Jump node
- Connect Jump > Pressed Jump
- Place a Stop Jumping node
- Connect Jump > Released Stop Jumping
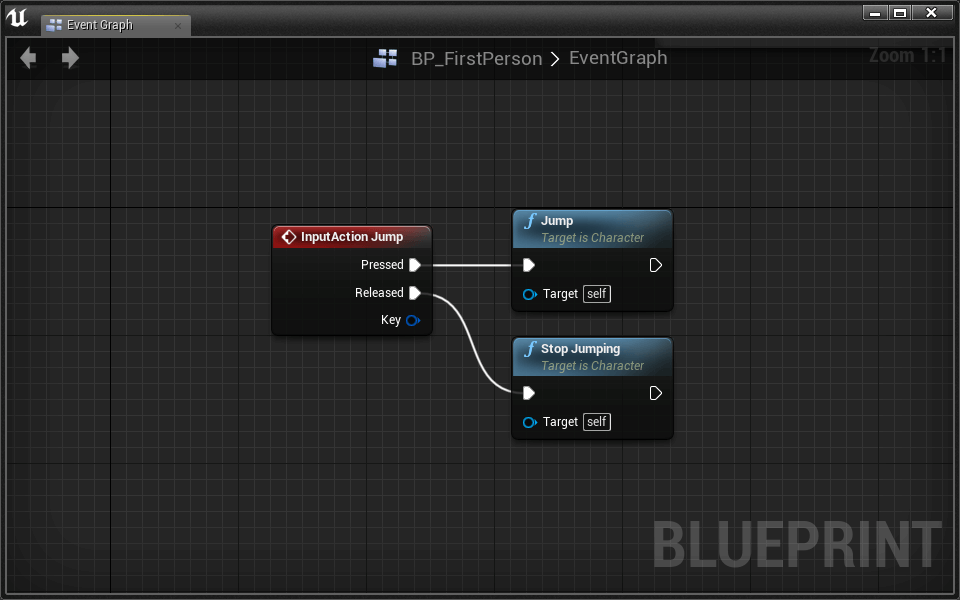
The Jump and Stop Jumping nodes come with the Character class and provide everything we need to make the role player jump. Examination it out! You tin can change how your histrion jumps in the CharacterMovement component details console.
Congratulations! You now accept a fully functional Starting time Person graphic symbol that is able to walk and jump in outset person.
Point and Click
Every bit with rotation, locomotion can pb to simulation sickness. We can skip this movement with teleportation. Let's create a mouse cursor that we can target as a teleport destination.
- Open the Lessons > Lesson4 > PointAndClick > PointAndClick level
- Create a new Character blueprint named BP_PointAndClick
- Open the new BP_PointAndClick pattern
- Add a Scene component
- Proper noun it CameraRoot
- Set location to [0, 0, 72]
- Add together a Camera component
- Cheque the Use Pawn Command Rotation option
- Uncheck the Lock to Hmd pick
- Attach it to CameraRoot by dragging the camera component on top of the photographic camera root component.
- Open PointAndClickGameMode
- Set the Default Pawn Form to BP_PointAndClick
Adding a Mouse Cursor
- Open the new BP_PointAndClick blueprint
- Add Layout'south BPC Mouse Cursor component
The BPC_MouseCursor requires y'all to phone call its Update function whenever you want to movement the mouse. Let'due south claw up our mouse movements to this node.
The BPC_MouseCursor is a component that acts as a wrapper for Layout's BP_MouseCursor. The BP_MouseCursor projects a 2D mouse position into 3D space and places a reticle at that location. If you lot're curious how it is implemented, check out the BP_MouseCursor in Blueprints > Utility.
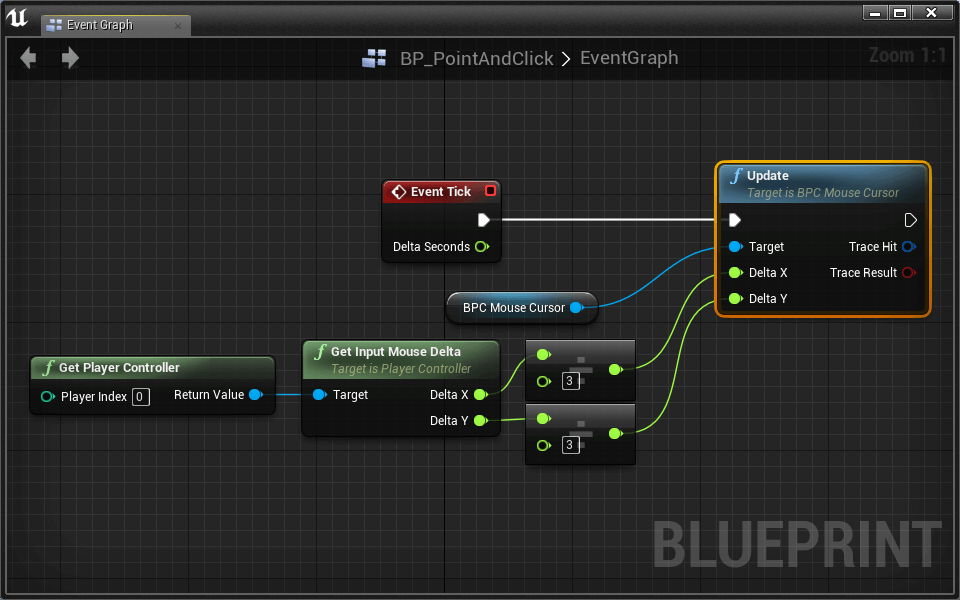
- Open the Event Graph
- Drag in a reference to the BPC_MouseCursor
- Pull a wire from the BPC_MouseCursor and place the Update node
- Tick Update
The Update node has two inputs for the cursor'south Delta X and Delta Y. We're going to use the mouse move for these inputs, merely they could hands exist gamepad or key inputs equally well.
- Place a Become Player Controller node
- Pull a wire and place a Become Input Mouse Delta
- Input Mouse Delta > Delta X Update > Delta 10
- Input Mouse Delta > Delta Y Update > Delta Y

Try it out! When you move your mouse, y'all'll meet a cursor in the world in 3D infinite. The cursor's default behavior is to remain in its location until the mouse moves. At that point, if the cursor is off screen it volition recenter itself.
You may decide that the cursor moves also quickly:
Challenge:
Change the Update > Delta X and Update > Delta Y inputs then that the cursor moves at 1/3 its current speed.
The Update function outputs a Trace Hit and a Trace Issue every bit well. We will utilise these a scrap later to decide if we can teleport to that location. Let's first go teleporting to piece of work!
Teleporting To The Cursor
A teleport activeness mapping is already fix in the Activity Mappings of your project with an input of Left Mouse Button.
- Open BP_PointAndClick'due south Issue Graph
- Identify our new ActionInput Teleport outcome
We need the cursor'due south location.
- Elevate down a reference to our BPC_MouseCursor component
- Pull a wire and place a Get Cursor Location
- Place a Set Role player Location
- Teleport Set Histrion Location
To avoid clipping through the footing, nosotros demand to set the character'south new location slightly above the location of the cursor. We can practice this with some simple math.
- Identify a Vector + Vector node
- Connect the Cursor's Location to the offset input
- Right click on the second input on Vector + Vector and select Split Struct Pin
By splitting the struct pin, we can add together but to the Z without creating a new vector.
Let'southward add together the exact amount we demand in the Z direction. That amount would be half the root CapsuleCompoent's elevation.
- Place a Get Scaled Capsue Half Height (CapsuleComponent) node
- Connect this to the Vector + Vector > Z
- Connect Vector + Vector Ready Role player Location > New Location
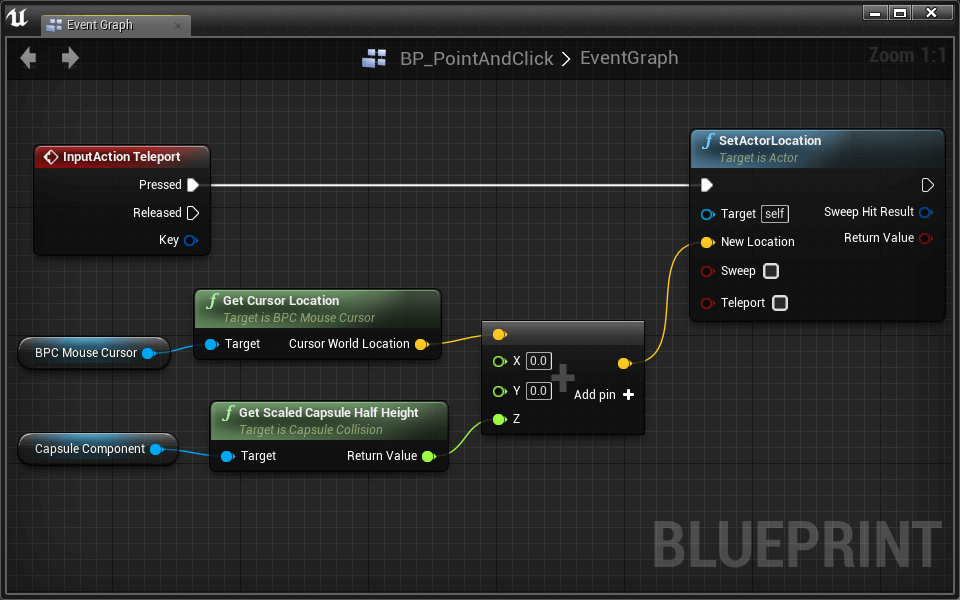
Test it out! Yous should be able to teleport wherever you click. This isn't always a good thing. Nosotros should merely teleport where the histrion tin can stand.
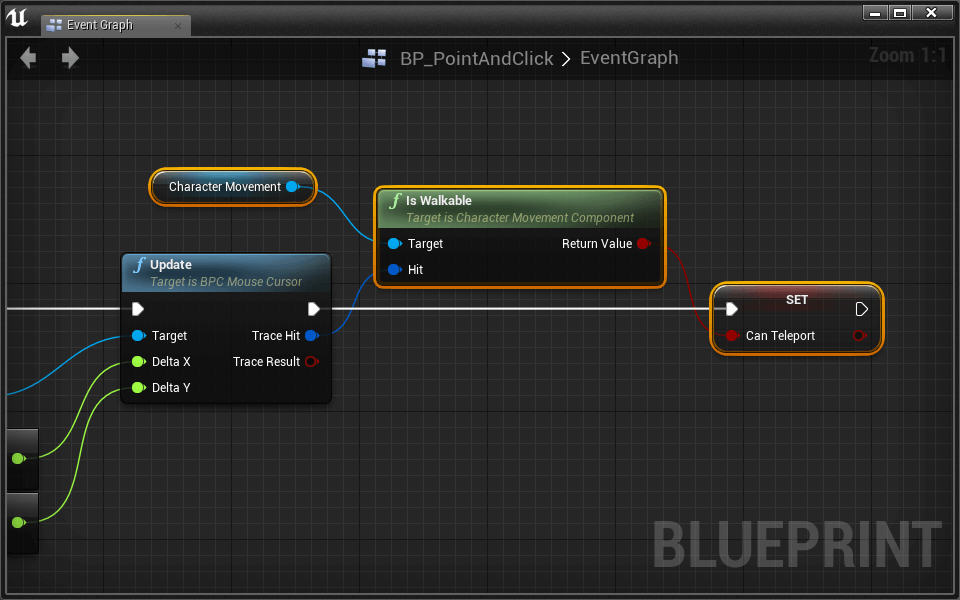
- Create a new Boolean variable named Can Teleport
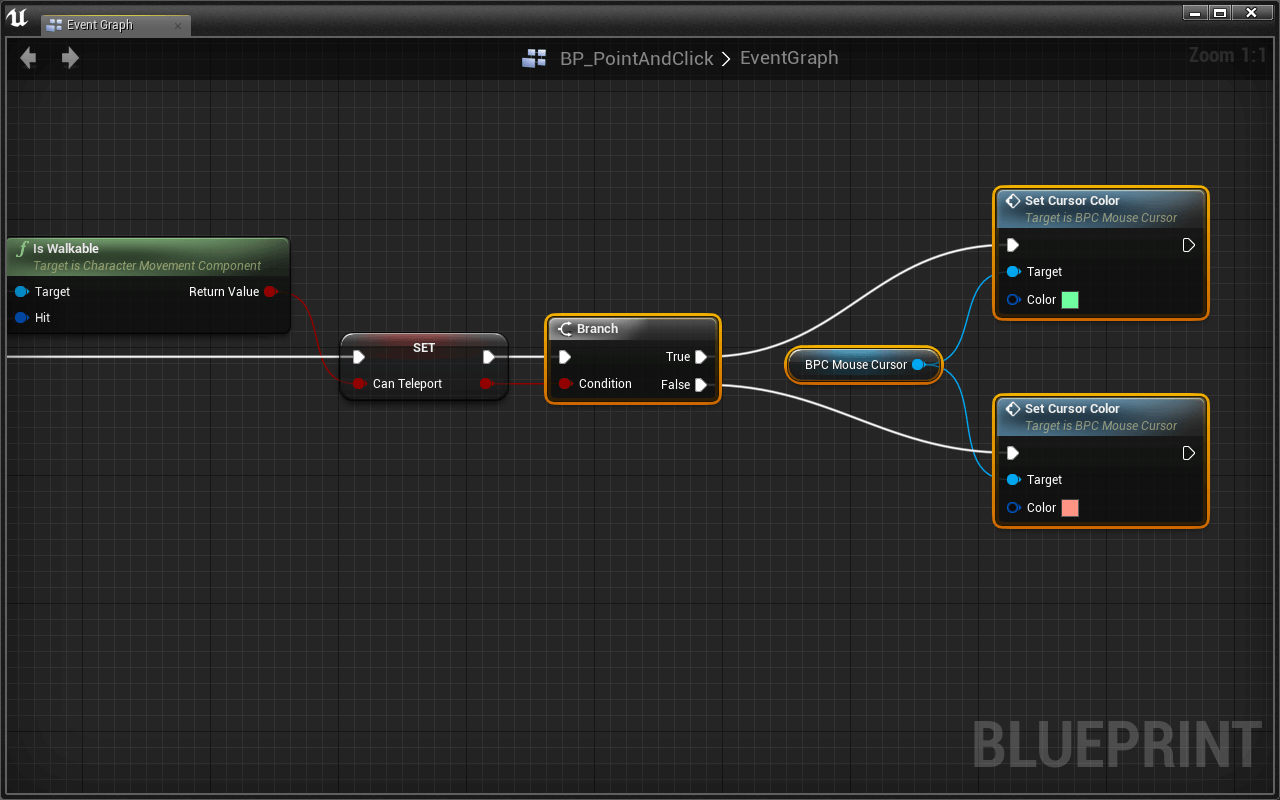
We're going to set this variable depending on whether or non the cursor is in a location that we tin can teleport to. Go back to your BPC Mouse Cursor > Update node.
- Pull a wire from Update > Trace Hit and place an Is Walkable (CharacterMovement) node.
- Set Can Teleport equal to the output of Is Walkable (CharacterMovement)
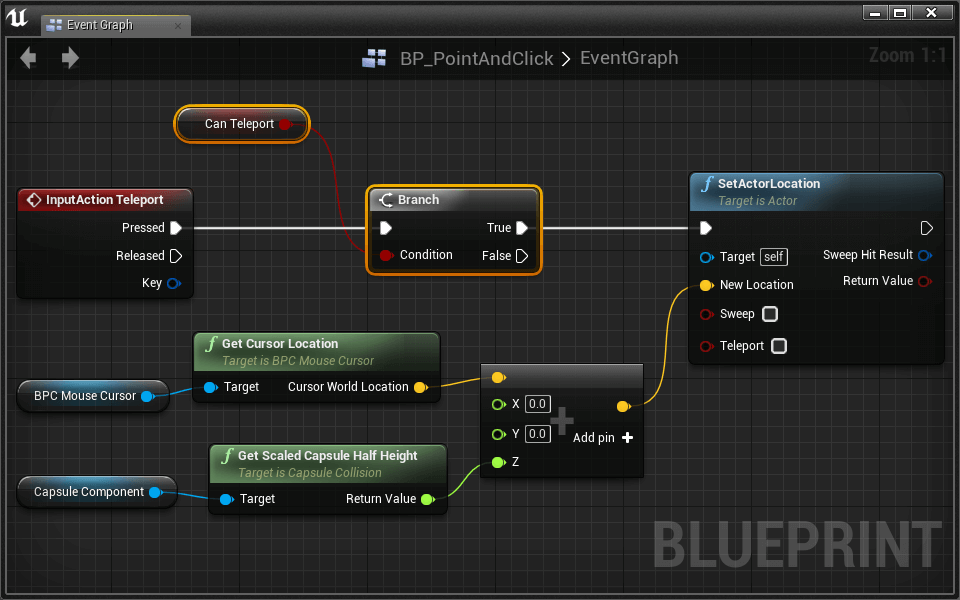
Challenge:
Apply the new Can Teleport variable and a Co-operative to only teleport when able.
As a player, it is difficult to know when yous can and tin can't teleport. Permit's change the cursor's color depending on whether or not nosotros can teleport to that location:
Challenge:
To ready the cursor's color:
- Elevate downward a reference to the BPC_MouseCursor
- Pull a wire and identify a Set Cursor Color node
Apply this knowledge to set the cursor'due south color to bespeak whether or not the player tin teleport.
Sweet! This is a absurd mode to get around.
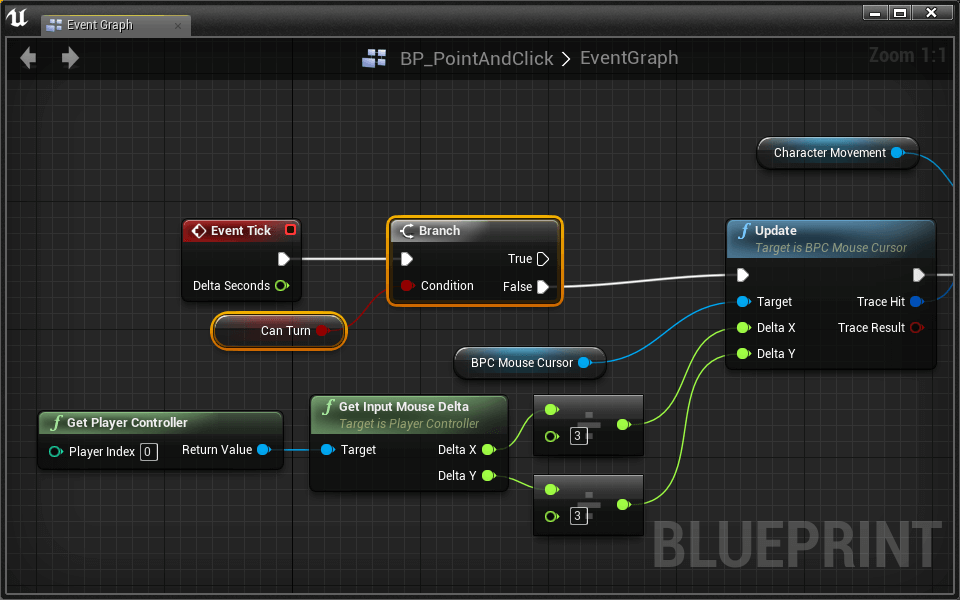
Mouse Jump Turns
Our graphic symbol can't plough without a VR headset. Let's add a new mechanism for turning your thespian.
The mouse jump plow is the jump plow with mouse input.
To execute a mouse jump plow, the player volition press Right Mouse Push button and motion the mouse left or correct. After moving the mouse some set corporeality, the character will do a jump plough.
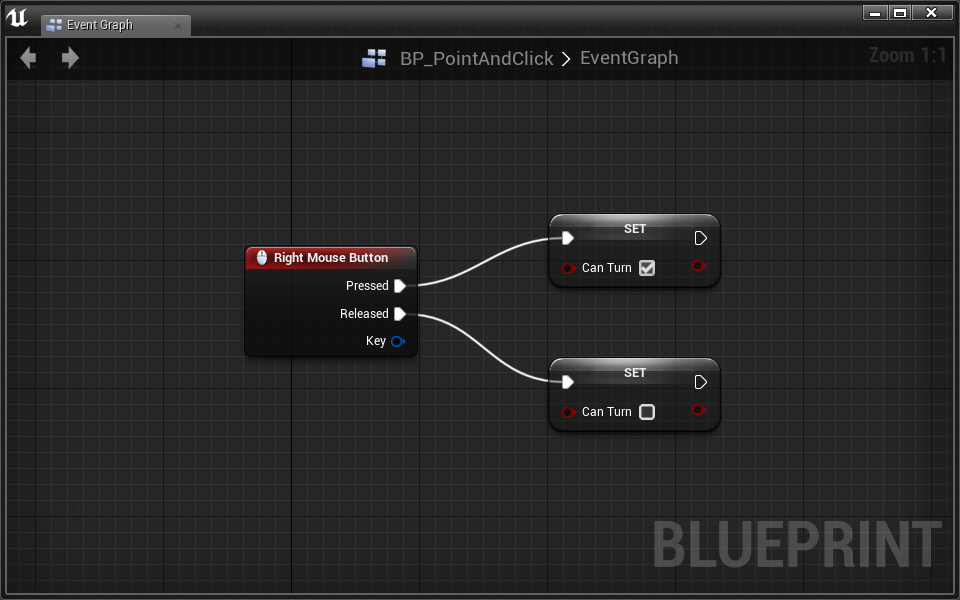
- Place a Right Mouse Push button outcome
- Create a new Boolean variable named Can Turn
- Fix Can Turn to true when Right Mouse Button > Pressed
- Set Can Turn to false when Right Mouse Button > Released
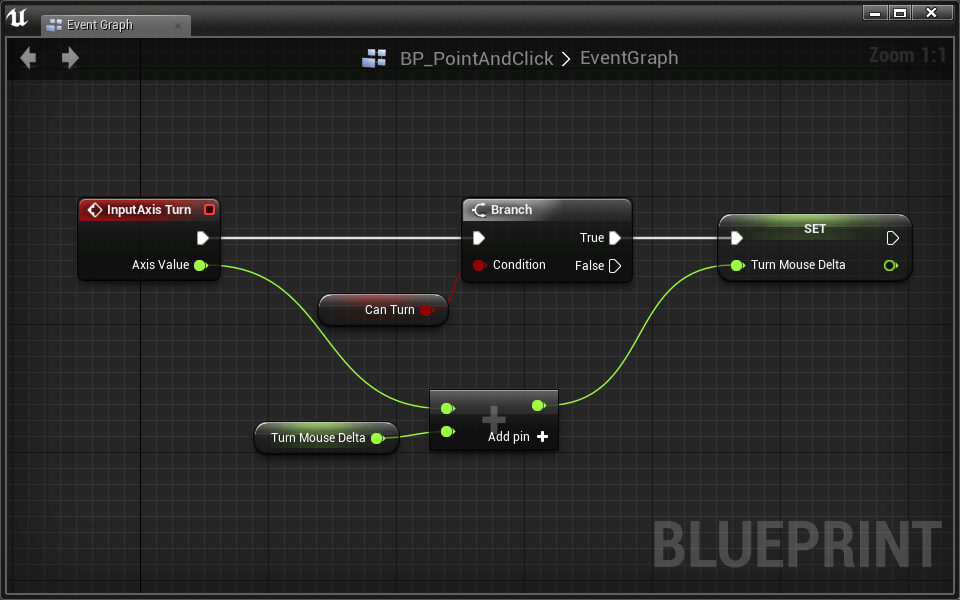
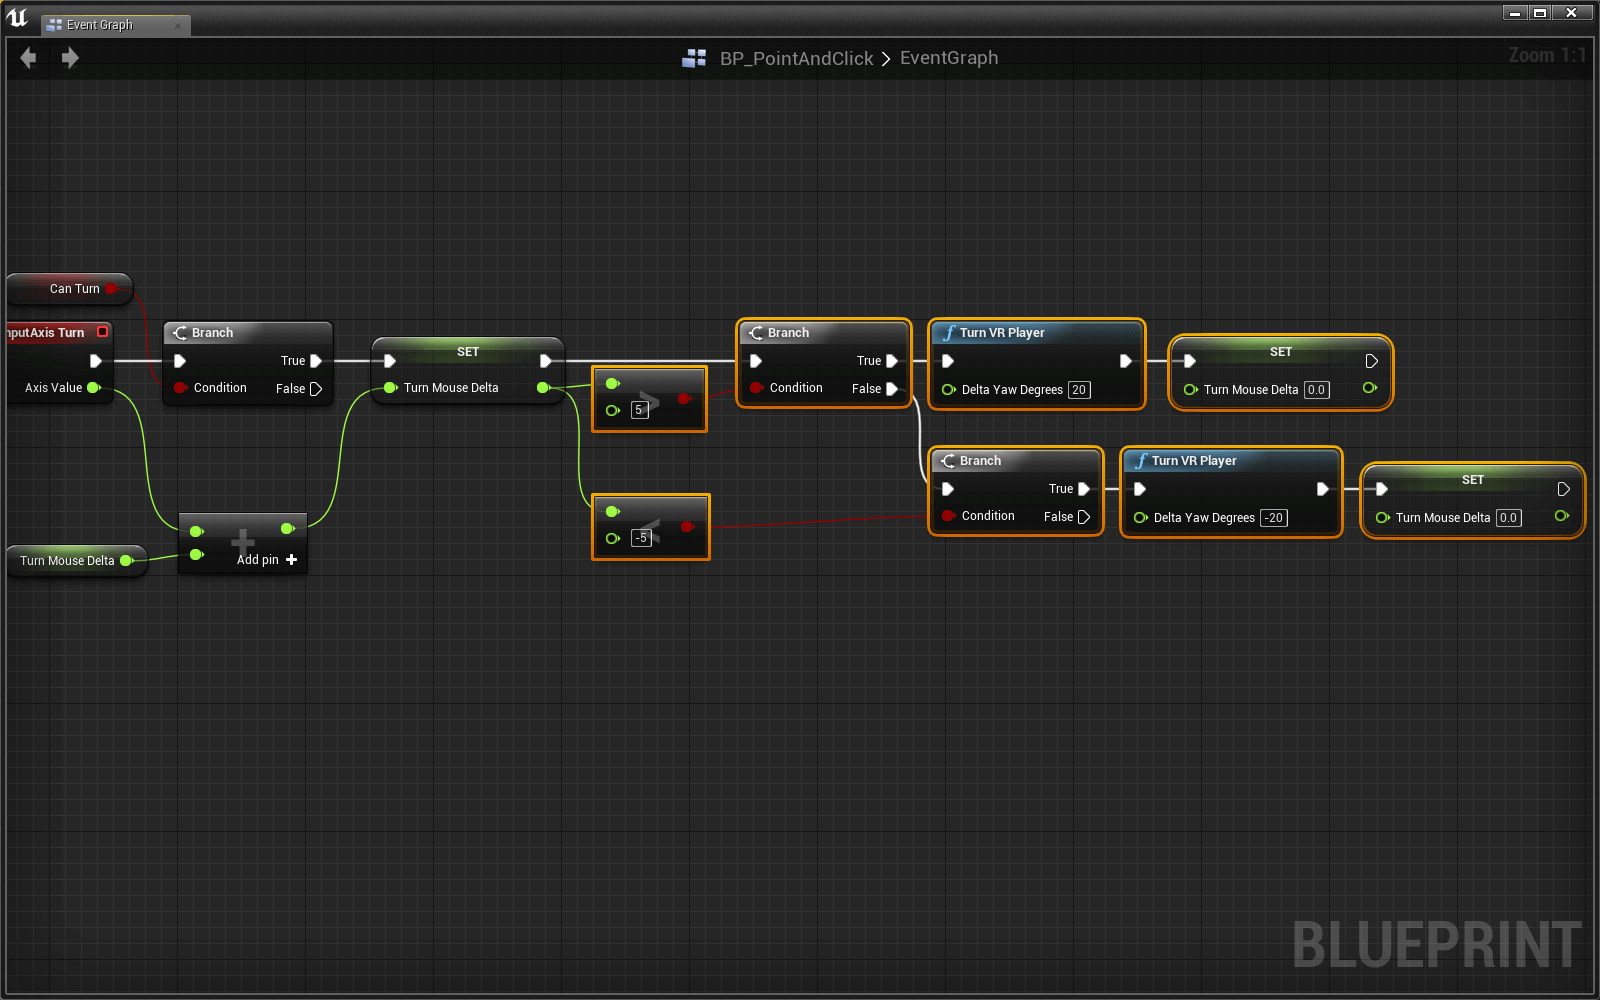
- Place a InputAxis Turn event
- Connect a Branch conditioned on Can Turn
Here we demand to recall most how this will work. The idea is that once we motion the mouse plenty, we volition make a Jump Turn. In order to keep track how much our mouse has moved since nosotros pressed the Right Mouse Button, we need to create a new variable.
- Create a new Float variable named Turn Mouse Delta
- Add Plow > Axis Value to Turn Mouse Delta if the player Tin Turn
Challenge:
If Plough Mouse Delta becomes greater than 5, use Turn VR Role player to plough the role player right. Similarly, if Plough Mouse Delta becomes less than -5, use Turn VR Player to plough the player left.
Don't forget to set up Turn Mouse Delta back to 0 afterward turning the thespian.
Test it to see that it works!
Great! One thing you may notice when you exam is that the cursor acts strangely when we turn with the mouse. Let'south simply Update the cursor when we're not turning.
- Insert a Branch betwixt Tick Update
- Condition the Branch on Can Turn
- Branch > Faux Update
Perfect! Now we tin can plow and teleport with the mouse. Play around in the world to get a feel for this motion scheme.
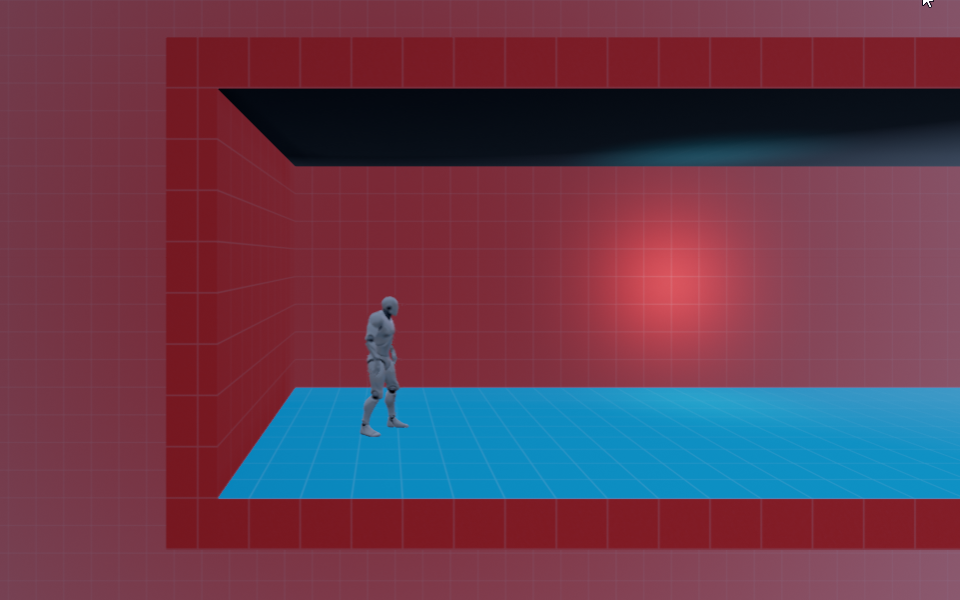
2.5D Gameplay
We've created two characters in the showtime person perspective, but this isn't the only character-camera relationship that works well in VR. Permit's create a new character from the 3rd person perspective. The character will motility in what'south called a 2.5D environment.
This video demonstrates 2.5D in action:
The camera is constrained to a aeroplane as the character moves. We've designed a level to have reward of this constraint.
- Open the Lessons > Lesson4 > 25D > 25D level
- Create a new Character blueprint named BP_25DPlayer
- Open up 25DGameMode
- Gear up the Default Pawn Class to BP_25DPlayer
- Open the new BP_25DPlayer pattern
Since we'll exist in Tertiary Person, nosotros tin't utilise an invisible character.
- Select the Mesh (Inherited) component
- Set Skeletal Mesh to SK_Mannequin
- Set Anim Blueprint Generated Class to ThirdPerson_AnimBP
- Fix Location to [0, 0, -88]
- Set Rotation to [0, 0, -xc]
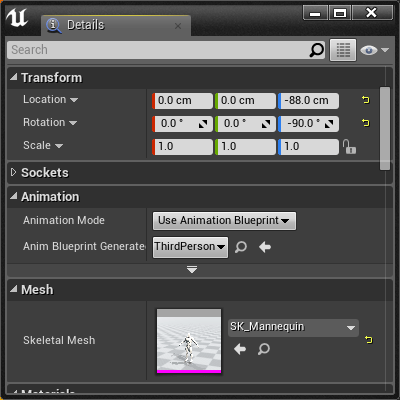
With Skeletal Mesh and associated Animation Design, our player has become a running humanoid.
Possess An External Camera
How a camera behaves in the third person perspective is disquisitional to comfortable VR. Permit's create a new camera thespian that follows the character:
- Create a new actor pattern named BP_25DCamera
- Open up the design and add a Camera component
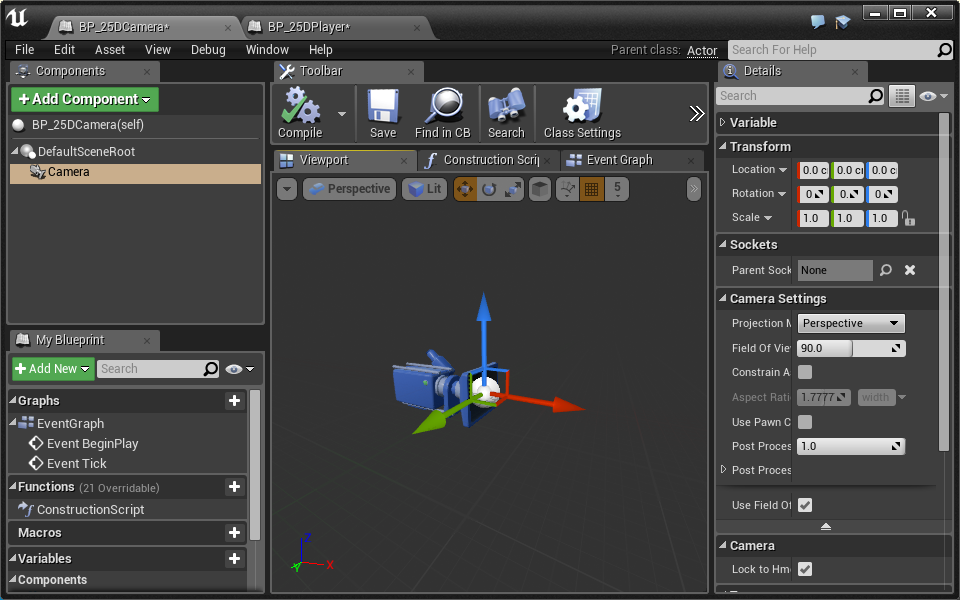
Until now, we oasis't needed to enable the Lock to Hmd setting of the camera component. Considering the player does not "own" the camera, Lock to Hmd should be enabled to ensure that BP_25DCamera tracks head motion.
In club to possess the external camera, we have to spawn it in the world, then explicitly make it our main camera.
- Open BP_25DPlayer
First, lets designate a place to spawn our photographic camera.
- Add a Scene Component
- Name it CameraSpawnPoint
- Ready Location to [0, 600, 150]
We demand to make sure our Camera spawn facing the right direction. A groovy way to practice this is with an Arrow Component.
- Add an Pointer Component
- Adhere it the the CameraSpawnPoint by dragging and dropping information technology on top
- Set Location to [0, 0, 0]
- Set Arrow Color to white (this is to forestall it from blending in with the cherry translation handle)
At present we have an arrow that shows the forrad direction of the component it is attached to.
![]()
The arrow component is usually simply used for development so information technology volition non bear witness up in the game unless yous explicitly tell information technology to.
It looks like we accept to rotate our CameraSpawnPoint to point towards our character.
- Set CameraSpawnPoint rotation to [0, 0, -ninety]
![]()
At present that our CameraSpawnPoint is set up, let's use its transform to properly spawn our BP_25DCamera.
- Open up the BP_25DPlayer Event Graph
Challenge:
When the game begins, spawn the BP_25DCamera using the CameraSpawnPoint'south world transform.
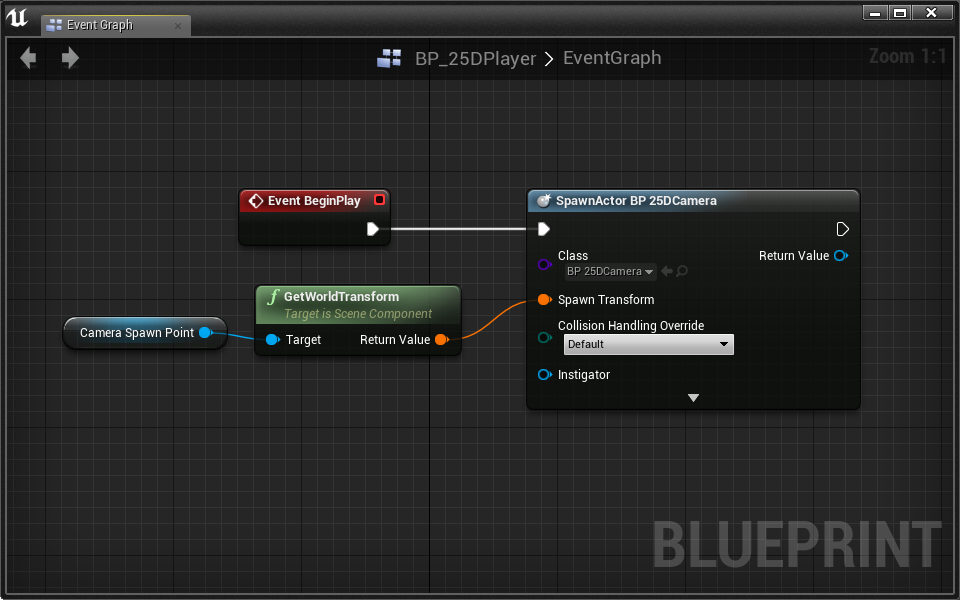
Nosotros've spawned the photographic camera with the correct transform, now let's possess the photographic camera! This tin can be washed using the Ready View Target With Alloy node:
- Place a Get Player Controller node
- Pull out a wire and place a Set View Target With Blend
- SpawnActor BP_25DCamera Set View Target With Alloy
- SpawnActor BP_25DCamera > Return Value New View Target
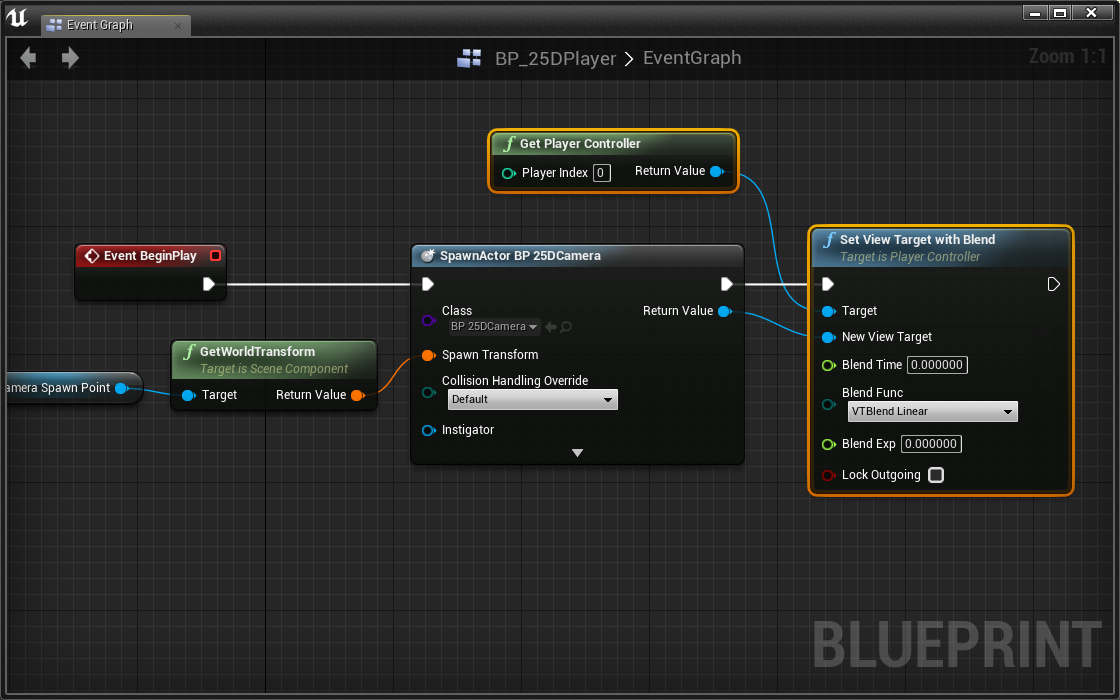
The Set View Target with Alloy node takes any histrion every bit its New View Target and possesses its camera. We've at present set our camera to the BP_25DCamera player that nosotros spawned.
- Get ahead and printing Play to test it out. Make certain to test information technology monoscopically and in VR.
Moving In 2.5D
We've got a static 2.5D photographic camera ready. Earlier we program our photographic camera to follow the player, lets program our role player to move!
- Place an InputAxis MoveRight event
- Connect an Add together Movement Input node
- MoveRight > Centrality Value Add Movement Input > Calibration Value
For the First Person perspective we used the character's right vector as the World Management, but that's not the instance here. Instead, we want to move the character along the Y axis.
- Set World Management to [0, 1, 0]
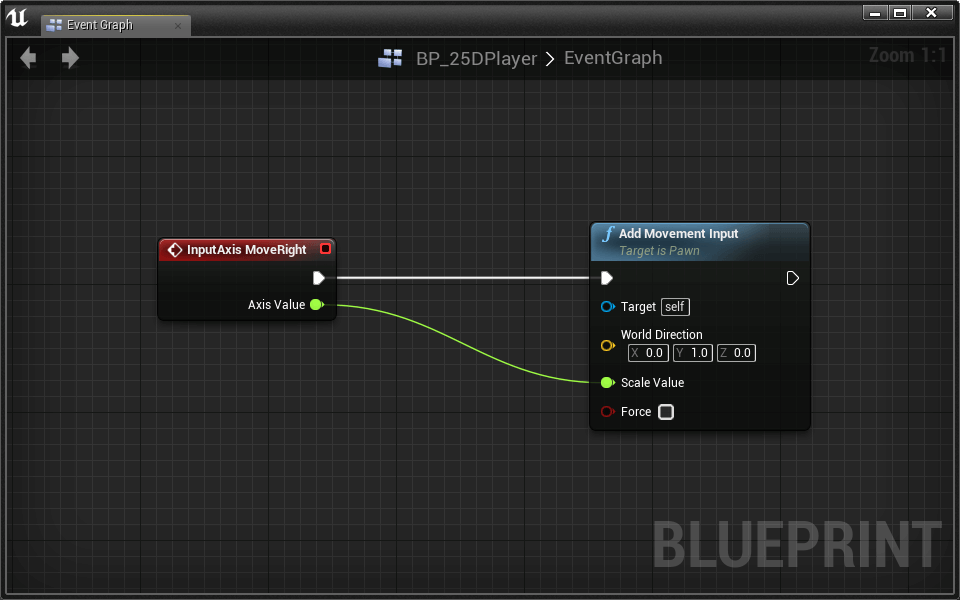
Great, now we can motion left and right!
Challenge:
Set the InputAxis MoveForward event to move the character along the X centrality.
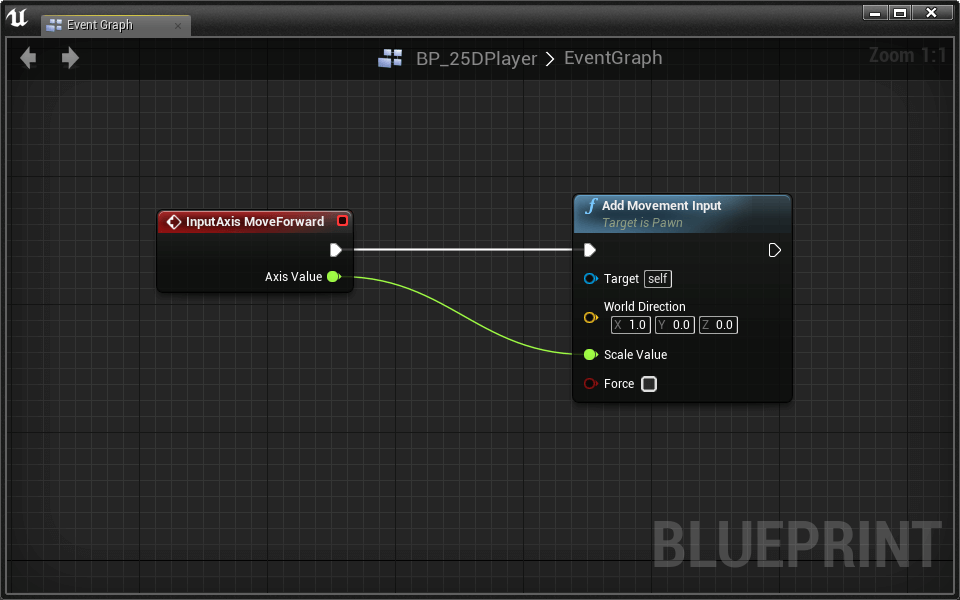
Exam it out. Everything works, but the character doesn't run in the direction it moves!
Moonwalking is cool, but we should probably set this:
- Select the CharacterMovement component
- Bank check the Orient Rotation to Movement box
In gild to get the above setting to not exist overridden:
- Select Class Defaults in the toolbar
- In the details console, uncheck Use Controller Rotation Yaw
At present your actor should run around the fashion you await.
Challenge:
For fun, add the ability for your character to Jump. Yous already did this for the Commencement Person perspective.
Following The Actor
Now that we can move, it'south time to follow the actor with our BP_25DCamera.
For now, we're going to script some very basic following behavior. Essentially, nosotros're going to constrain our camera to the X Axis while following the thespian'due south Y and Z location. It will look like this when we're done:
Somewhen, nosotros'll be updating the BP_25DCamera's location on Tick. Nosotros can't practise this until nosotros know where we should position our photographic camera. The math for our camera position looks similar:
The Camera X Location is the camera'south original X location in the world. We demand this to constrain our camera to the X Axis.
The Camera Showtime is the camera's relative get-go from the actor.
Challenge:
Take your time to think nearly the math, then brand it happen! Your challenge is to write the code to get the photographic camera to follow the player in a 2.5D fasion.
Warning: this challenge is not footling. Requite it some fourth dimension before y'all decide yous tin't do it.
You lot'll need to shop two variables when the photographic camera is spawned on BeginPlay: Camera X Location and Camera Starting time
To calculate the Camera Showtime:
On Tick you'll take to use the player'southward location and your two variables to gear up the BP_25DCamera's Location using SetActorLocation
Hint: You lot need to apply Split Struct on your vector pins and/or a Suspension Vector node to isolate X, Y, and Z values.
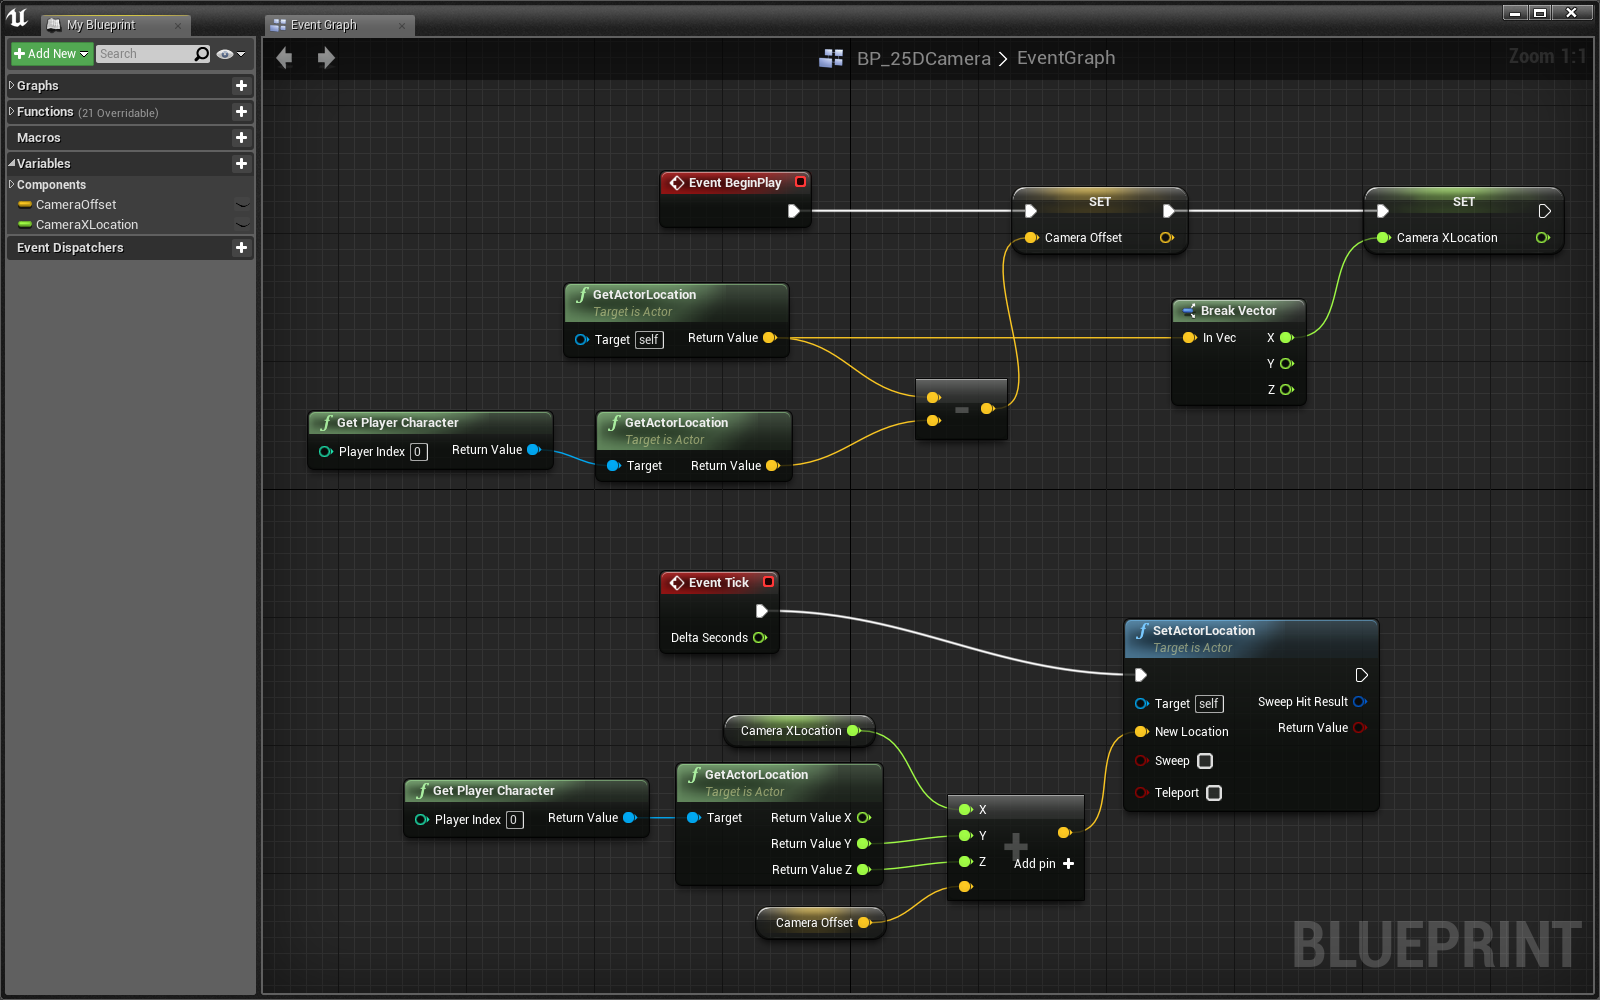
Awesome! Our 2.5D perspective is complete. Information technology should work like this:
Using A Spring Arm
Our camera makes no attempt to smooth movement. With the Spring Arm component, we can to dampen sudden changes in location.
- Open BP_25DCamera
- Add together a Spring Arm component
A Spring Arm is like a flexible camera smash. As the boom moves, an attached camera will slowly accelerate to follow.
- Attach the Camera component to the Spring Arm
The camera will automatically attach itself to the "end" of the arm.
- Set the Spring Arm's Target Arm Length to 50
We set the flexibility of the Spring Arm with the Camera Lag setting.
- Bank check the Spring Arm's Enable Photographic camera Lag option
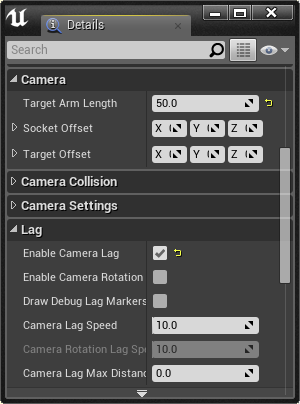
Y'all can arrange the amount of photographic camera lag using the Camera Lag Speed option. Tweak your Leap Arm settings until you're comfortable!
Shrinking The World
Many third person VR experiences take place in pocket-size environments. When the world is small-scale, players move greater distances with positional tracking. The effect this has on immersion is amend experienced than explained.
- Open the Settings carte du jour from the Level Editor toolbar
- Select Earth Settings
- In the VR category of the details panel, set Earth to Meters to 500
With ane setting, nosotros've scaled environment elements to i/5 their normal size. We've also effectively increased the virtual interpupilary distance. Commonly referred to as IPD, interpupulary altitude is the distance between a person's eyes. As this distance increases, viewed objects appear smaller.
Resetting The HMD
It's useful to reset a role player'due south orientation and location relative to the virtual surroundings.
- Open BP_25DPlayer
We've added an Axis Mapping called ResetHMD that fires on Tab and Gamepad Special Left.
- Place a ResetHMD consequence
- Place a Reset Orientation and Position node
- ResetHMD > Pressed Reset Orientation and Position
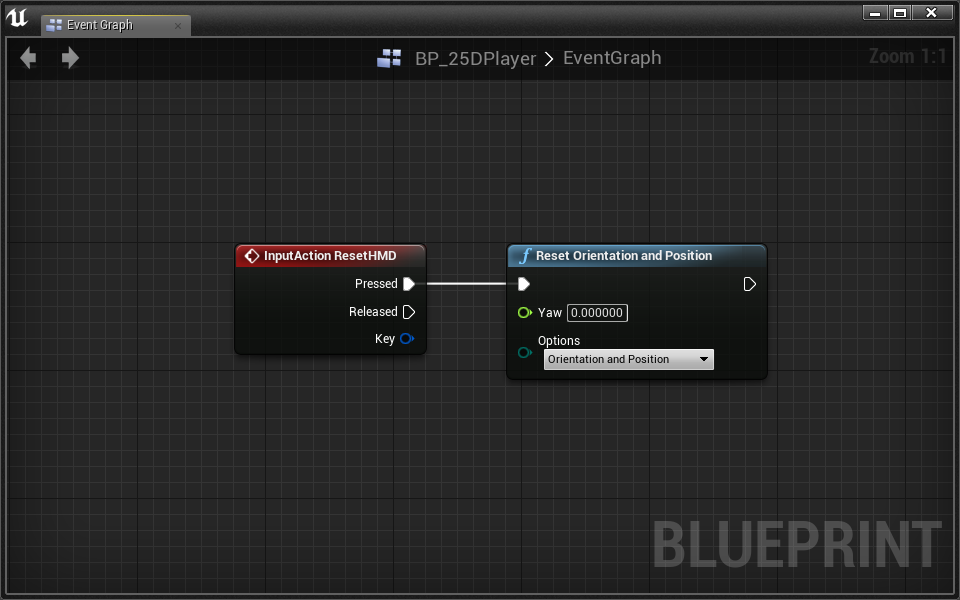
Beautiful! Now whenever y'all press Tab or Gamepad Special Left, your HMD'south origin will be reset.
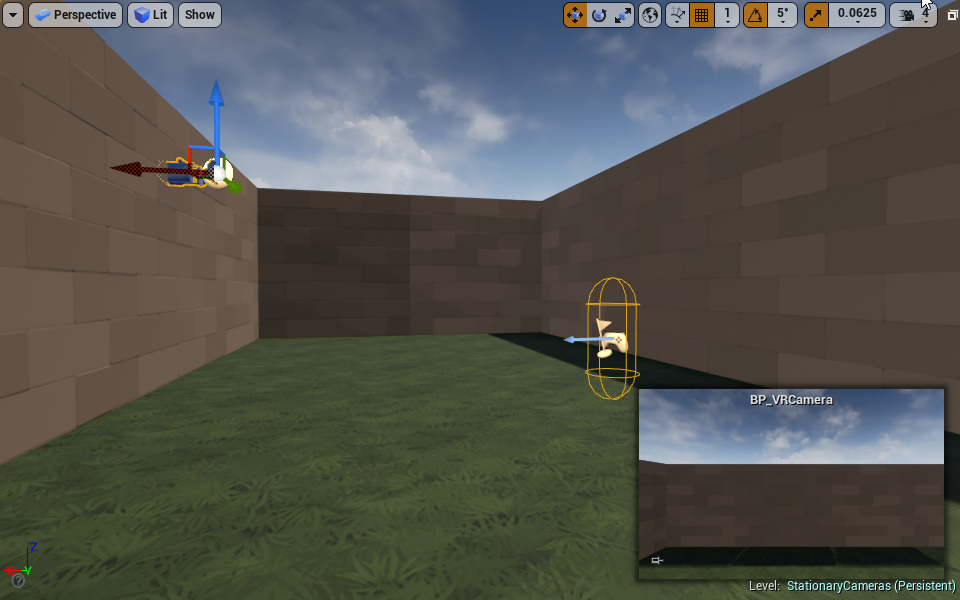
Stationary Cameras
We can disable thespian motion entirely with stationary cameras. Every bit a character moves through the level, we tin automatically switch the player between perspectives for the best point of view.
Picket this video to get a ameliorate thought of this character-camera relationship:
Nosotros've colored the camera trigger boxes pink in this video, but they'll be invisible in your game.
- Open up the Lessons > Lesson4 > StationaryCameras > StationaryCameras level
This type of gameplay is similar to two.5D in that nosotros'll be using external cameras rather than the player's camera. Instead of using i camera, we'll place several throughout the level, and so switch between them. To starting time, let's create a camera histrion that we can place in our globe:
- Create a new actor blueprint named BP_VRCamera
- Add a Camera component
That's it for now!
- Place a BP_VRCamera somewhere in the globe facing the PlayerStart. We need it facing player starting time so we can see our character when we play the game.
When you place your BP_VRCamera, make sure to not rotate its pitch. We'll demo why at the end of this section.
If y'all press play at present, you won't become good results. The problem is that we haven't possessed our new camera.
- Open the BP_SwitchCameraCharacter which has been premade for you with basic movement and jumping mechanics.
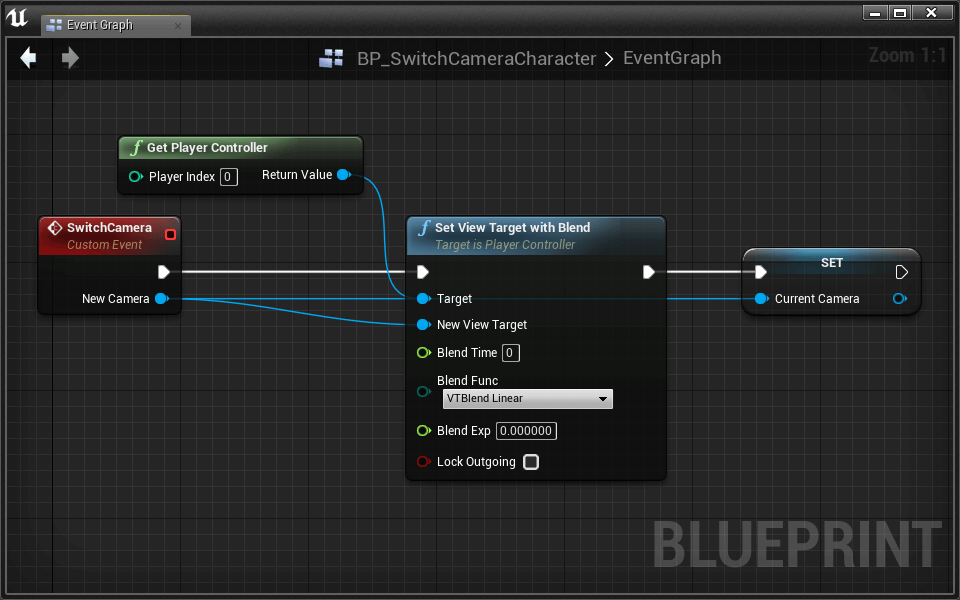
- Place a new custom event named SwitchCamera
- Add a BP_VRCamera input named NewCamera
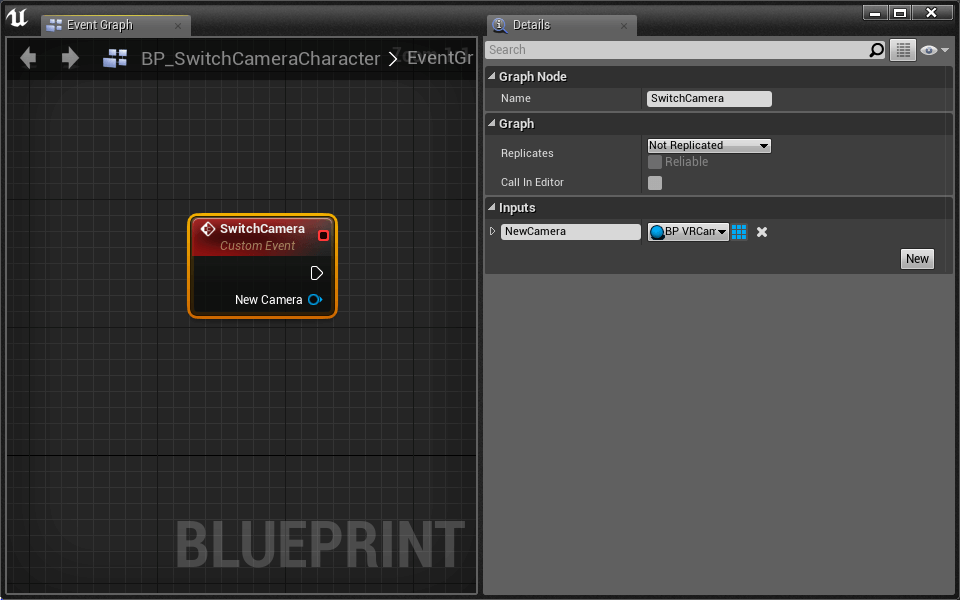
- Place a Get Player Controller node
- Pull a wire and place a Set View Target with Blend
- SwitchCamera Set View Target with Blend
- New Camera New View Target
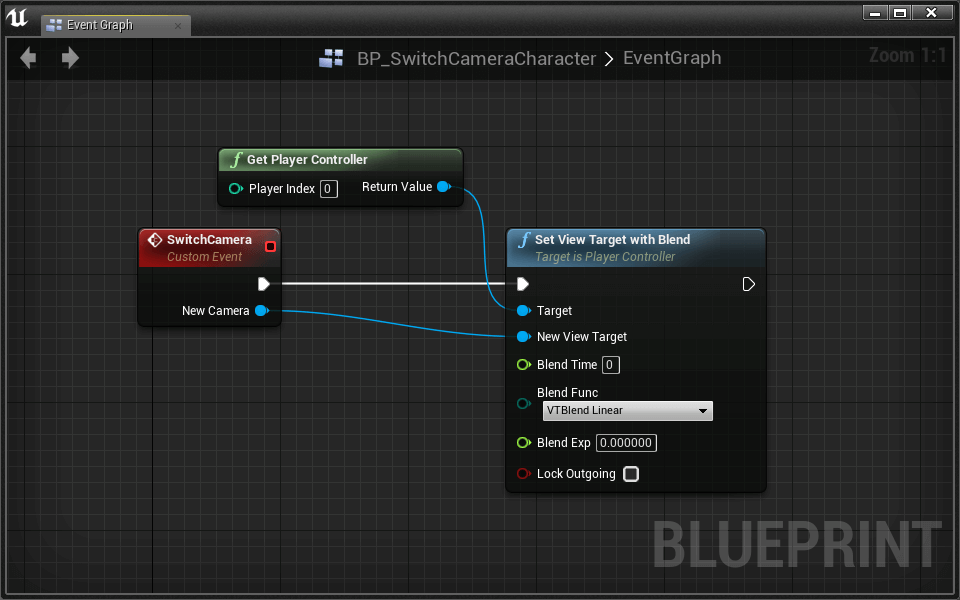
Remember, the Set View Target with Blend is what sets our new camera perspective. It takes any histrion as its New View Target and possesses its camera.
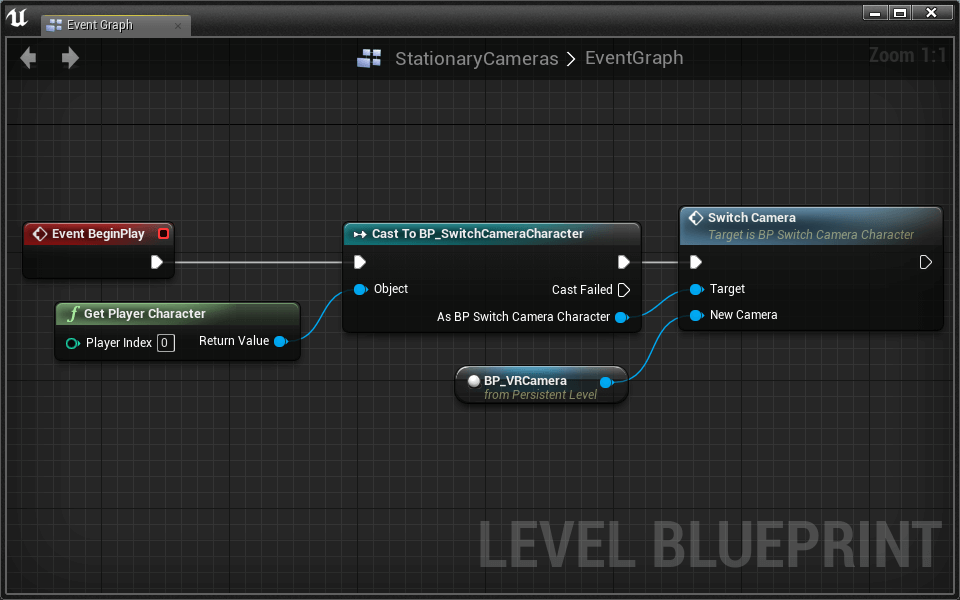
The last thing nosotros need to practise is burn down our new SwitchCamera event from the level design.
- Open the Level Pattern
- Place a Get Player Character node
- Connect it to a Bandage to BP_SwitchCameraCharacter node
- BeginPlay Cast to BP_SwitchCameraCharacter
- Pull a wire from Every bit BP_SwitchCameraCharacter and place a SwitchCamera node
- Connect Cast to… SwitchCamera
- Get a reference to the BP_VRCamera y'all placed before. Practice this by selecting the BP_VRCamera in the earth and then right clicking in the Level Blueprint and select Create a Reference to BP_VRCamera.
- Connect BP_VRCamera SwitchCamera > NewCamera
Nosotros mentioned that you should never pitch cameras in VR. Don't believe united states of america? Go ahead and endeavour it for yourself!
- Set the pitch rotation of BP_VRCamera to something other than 0 and examination in VR.
- Effort not to get sick
- Disengage! Undo!
Monoscopic Camera Movement
We need to enable automatic photographic camera move when the actor is non in VR.
- Open BP_VRCamera
- Place a Is Head Mounted Display Enabled node
- Place a Branch conditioned on Is Head Mounted Display Enabled
- Tick Branch
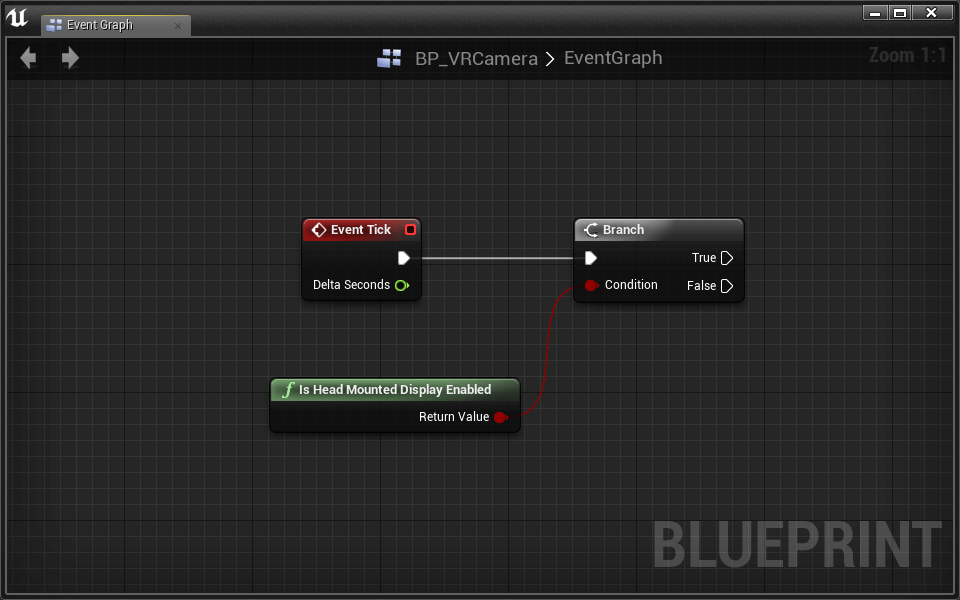
The strategy is unproblematic: every frame, we update the camera'south rotation to point toward the thespian.
Challenge:
Rotate BP_VRCamera to follow the player character every frame. Only rotate if the HMD is non enabled.
To prepare BP_VRCamera'south rotation, use the Gear up Histrion Rotation node.
To calculate the proper rotation for the camera, apply the Find Wait at Rotation node. You'll want the rotation from BP_VRCamera to the thespian.
To get the BP_VRCamera'due south location, utilize the Get Thespian Location node.
To get the actor character's location, use Become Player Pawn Get Histrion Location
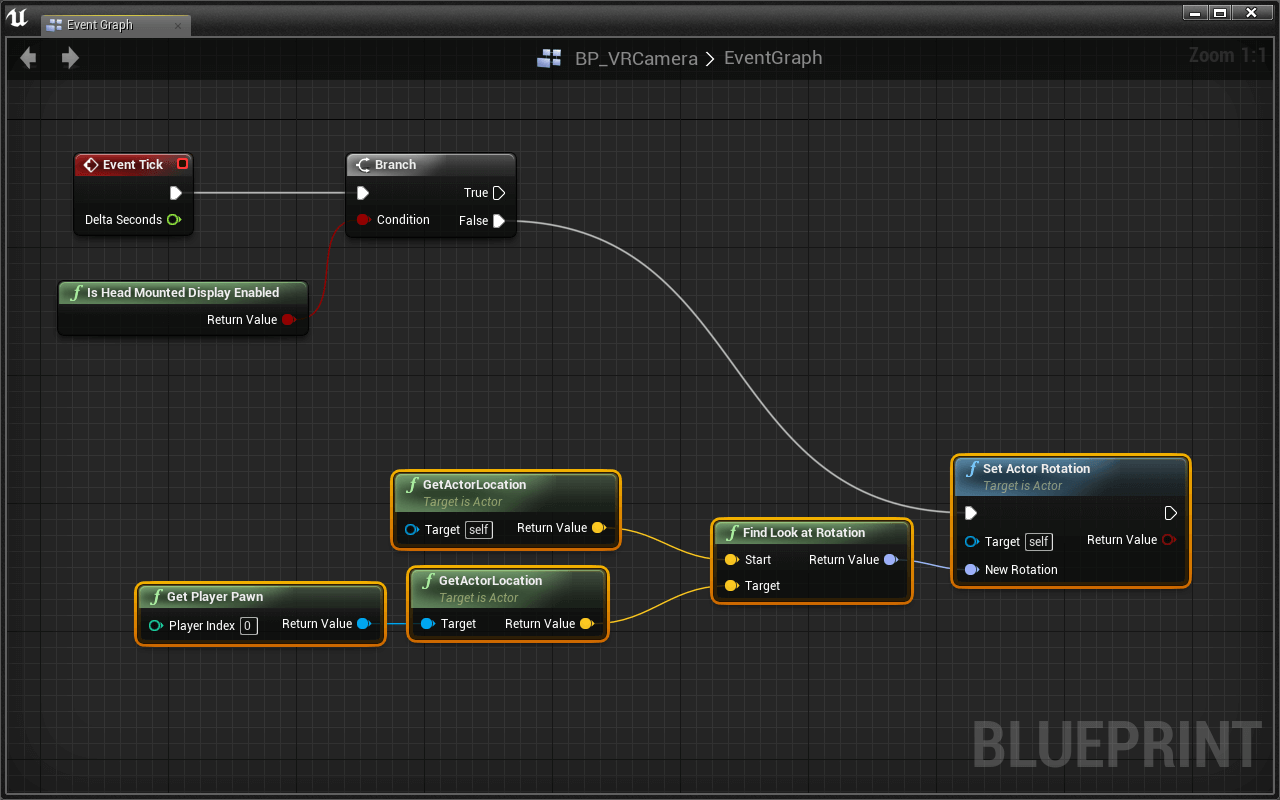
Examination without the HMD. The camera should follow the histrion character wherever it goes.
Thanks to Lock to Hmd, our camera automatically works in VR. This means we don't have to execute anything on false.
Thespian Movement
We at present have a possess-able camera actor that works both in and out of VR. One thing you may detect, controlling the character feels strange. Let'south meet what we can do to make it feel more natural.
- Open BP_SwitchCameraCharacter
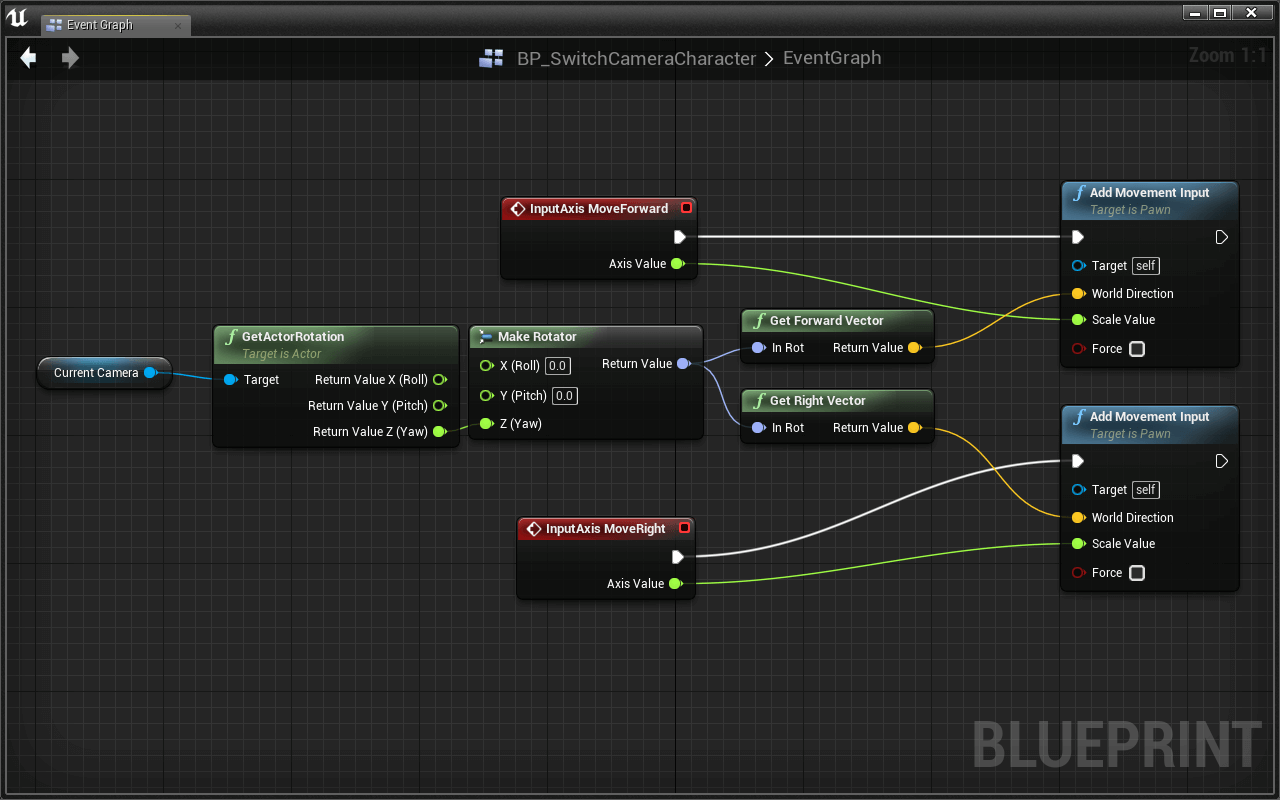
Currently, the movement code is using hard coded World Management values. Allow's come across how it feels to use the frontwards and right vectors of our electric current photographic camera. To start, we have to shop our current camera.
- Create a new BP_VRCamera variable named CurrentCamera
- At the finish of the SwitchCamera issue, set CurrentCamera equal to SwitchCamera > New Camera
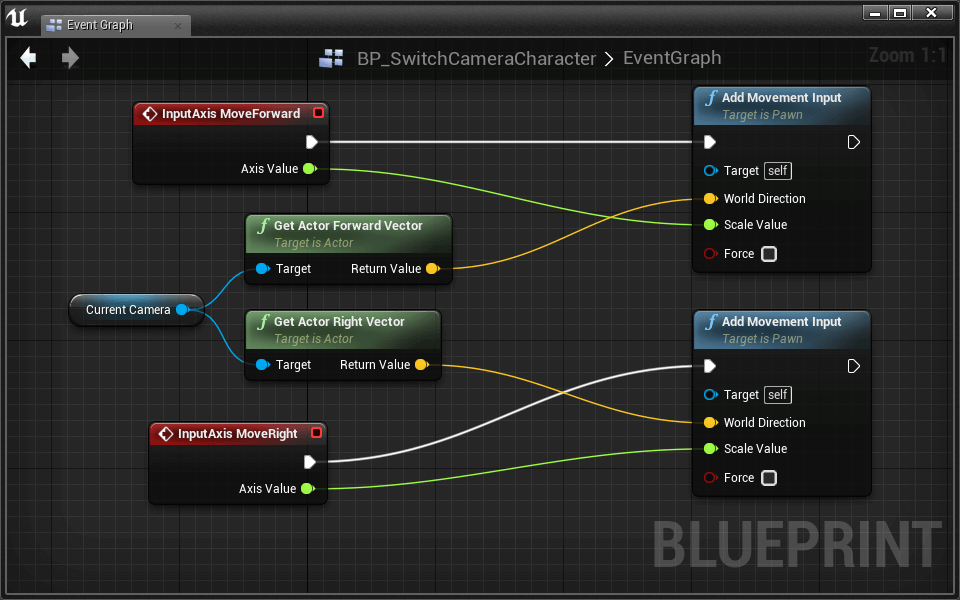
We demand to get the camera'due south frontward and right vectors as input for the Globe Directionsouthward in our motion code.
- Become a reference to the CurrentCamera variable
- Pull a wire and place a Go Actor Forwards Vector
- Get Actor Forward Vector > Render Value Add together Movement Input > World Direction
- Practice the same for the Right Vector
Exam it out! Moving around should feel better.
There is one difficult-to-spot issues in this code. If you look down while wearing your HMD, your player will run slower. This is because your camera's forward vector starts pointing downwardly, which makes your player character try to run downwards besides.
To fix this, we need to ignore the Pitch and Roll of the camera's rotation. We only want the Forward and Right Vectors from the camera's Yaw rotation.
- Delete Get Histrion Forward Vector and Get Actor Right Vector
- Pull a wire from CurrentCamera and place a Get Actor Rotation node.
- Right click the output and select Dissever Struct Pin
- Place a Make Rotator node
- Connect Get Histrion Rotation > Return Value Z (Yaw) Make Rotator > Z (Yaw)
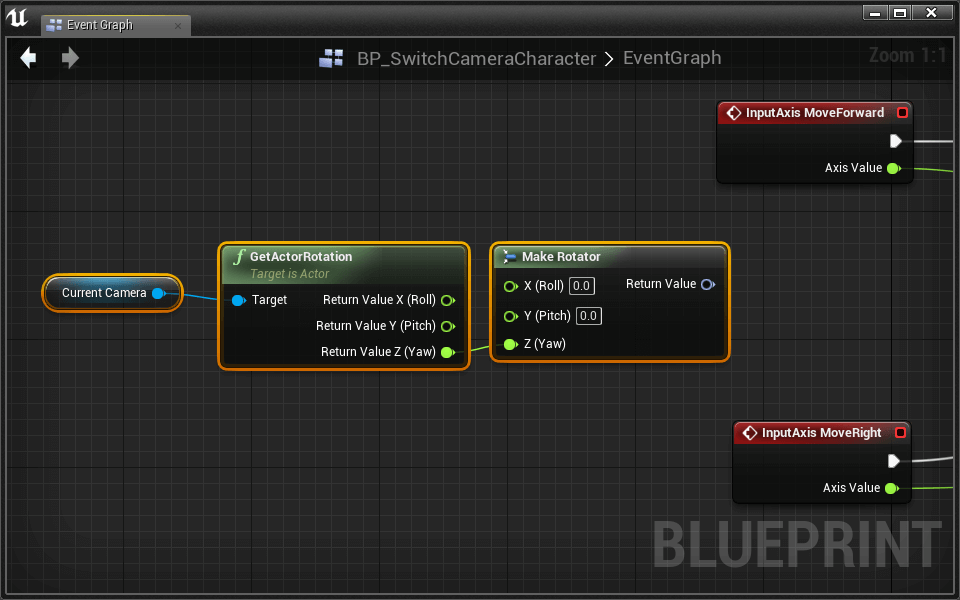
We've now isolated the Yaw rotation of CurrentCamera.
- Pull a wire from Brand Rotator > Return Value and identify a Get Forrard Vector node.
- Exercise the same for a Get Right Vector node
- Connect the Forwards and Right Vectors into the correct Add Motility Input nodes.
Switching Cameras
Permit's add together new cameras to the level and switch between them.
- Create a new actor blueprint named BP_SwitchCameraTrigger
- Add a Box Collision component
- Right click the Box Collision component and select Add together Event > Add OnComponentBeginOverlap
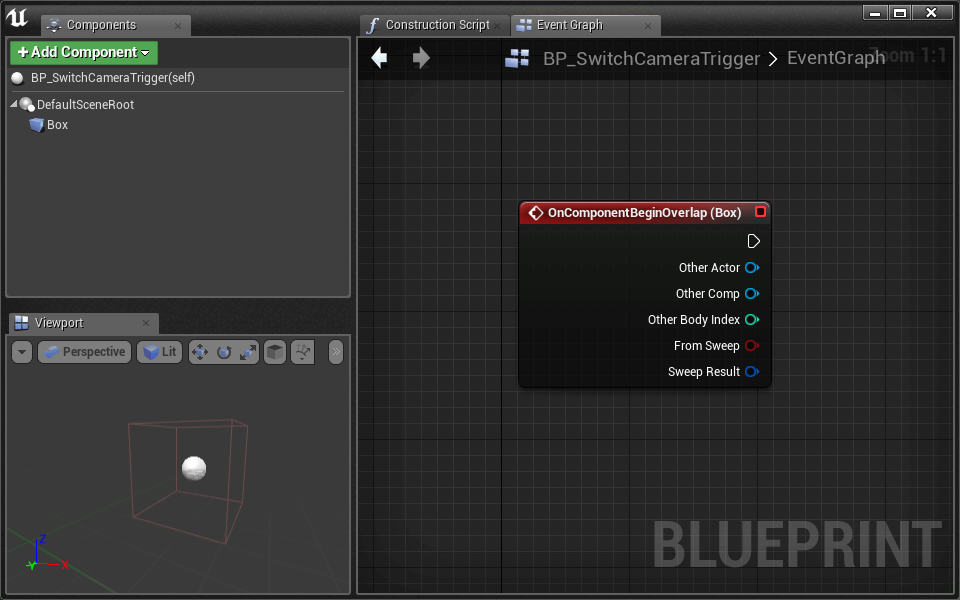
This trigger will piece of work past telling BP_SwitchCameraCharacter to SwitchCamera when the player overlaps the trigger. This ways the trigger needs to store a reference to the new camera actor.
- Create a new BP_VRCamera > Reference variable named TargetCamera
- Cheque the Editable box
- Compile
Past making this variable Editable (more than unremarkably known every bit Public), we can change its value from within the editor.
- Place a second BP_VRCamera somewhere in your world.
- Place a BP_SwitchCameraTrigger where you think appropriate. When your player character runs into it, imagine switching to your new camera view.
- Scale the trigger so it'due south impossible to miss
- In the details panel, select the proper Target Camera from the drop down. Yous want to choose the photographic camera that your histrion's view will change to when overlapping the trigger box.
Time to add together the code to switch cameras in the BP_SwitchCameraTrigger. We'll do something very similar to what we did in the Level Blueprint
Challenge:
When the BP_SwitchCameraTrigger is overlapped, we want to bank check if it was the player that overlapped, then call SwitchCamera if information technology was. Switch the camera to the trigger's Target Photographic camera.
Use Cast to BP_SwitchCameraCharacter to check if OnComponentBeginOverlap (Box) > Other Role player is really the player character.
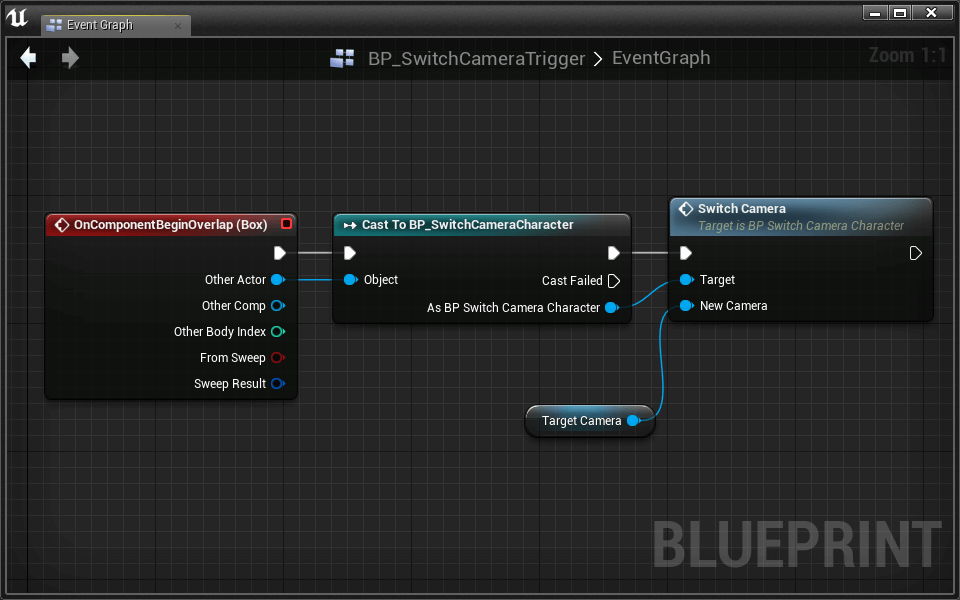
Switching cameras is now fully functional. Information technology'southward up to you to identify more than BP_VRCameradue south and their associated BP_SwitchCameraTriggerdue south throughout the level.
Fading Between Cameras
Fading between cameras can improve condolement. We'll utilize a timeline and Fix Transmission Camera Fade.
- Open BP_SwitchCameraCharacter
We'll make our fade wrap around the SwitchCamera upshot. When the event fires, we'll fade the scene out, switch cameras, and then fade back in.
This ways we accept to insert our fade to blackness lawmaking in between SwitchCamera Set up View Target with Blend:
- Create a new Timeline that curves a float rail from 0 to one over 1 second
- To create the timeline, right-click and search "Add Timeline"
- Name the timeline FadeToBlack
- If you demand a refresher on how to edit a timeline, it was discussed in the Pop-Up Target section of Lesson three
- SwitchCamera FadeToBlack > Play from Get-go
Now we demand to utilize our timeline's output to fade the scene to black.
- Place a Get Thespian Camera Manager node
- Pull out a wire and place a Prepare Transmission Camera Fade node
- FadeToBlack > Update Gear up Manual Camera Fade
- FadeToBlack > Data Set Manual Camera Fade > In Fade Amount
- FadeToBlack > Finished Set View Target with Alloy
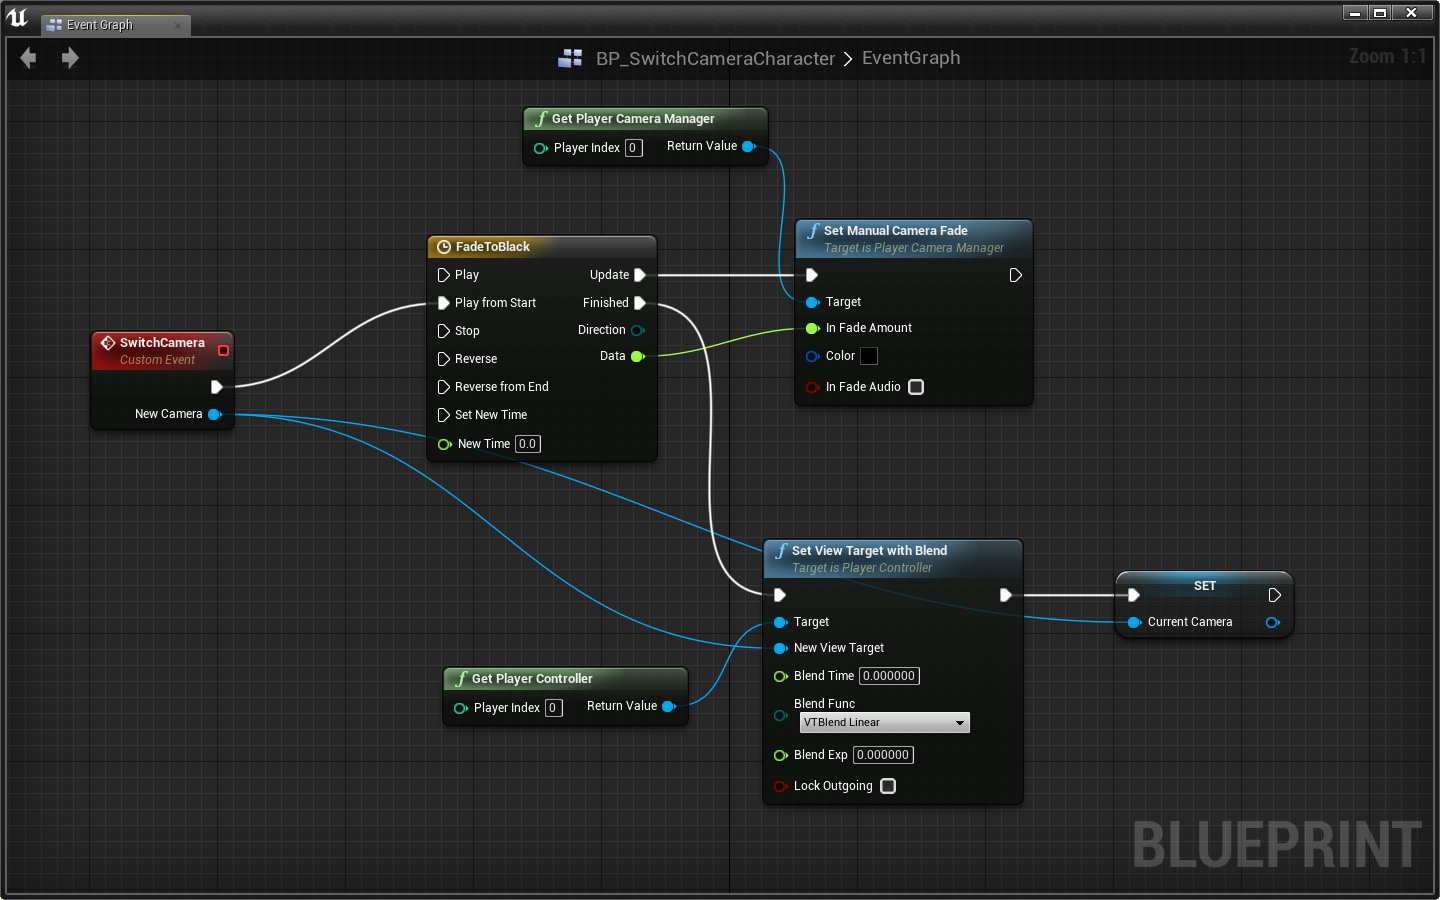
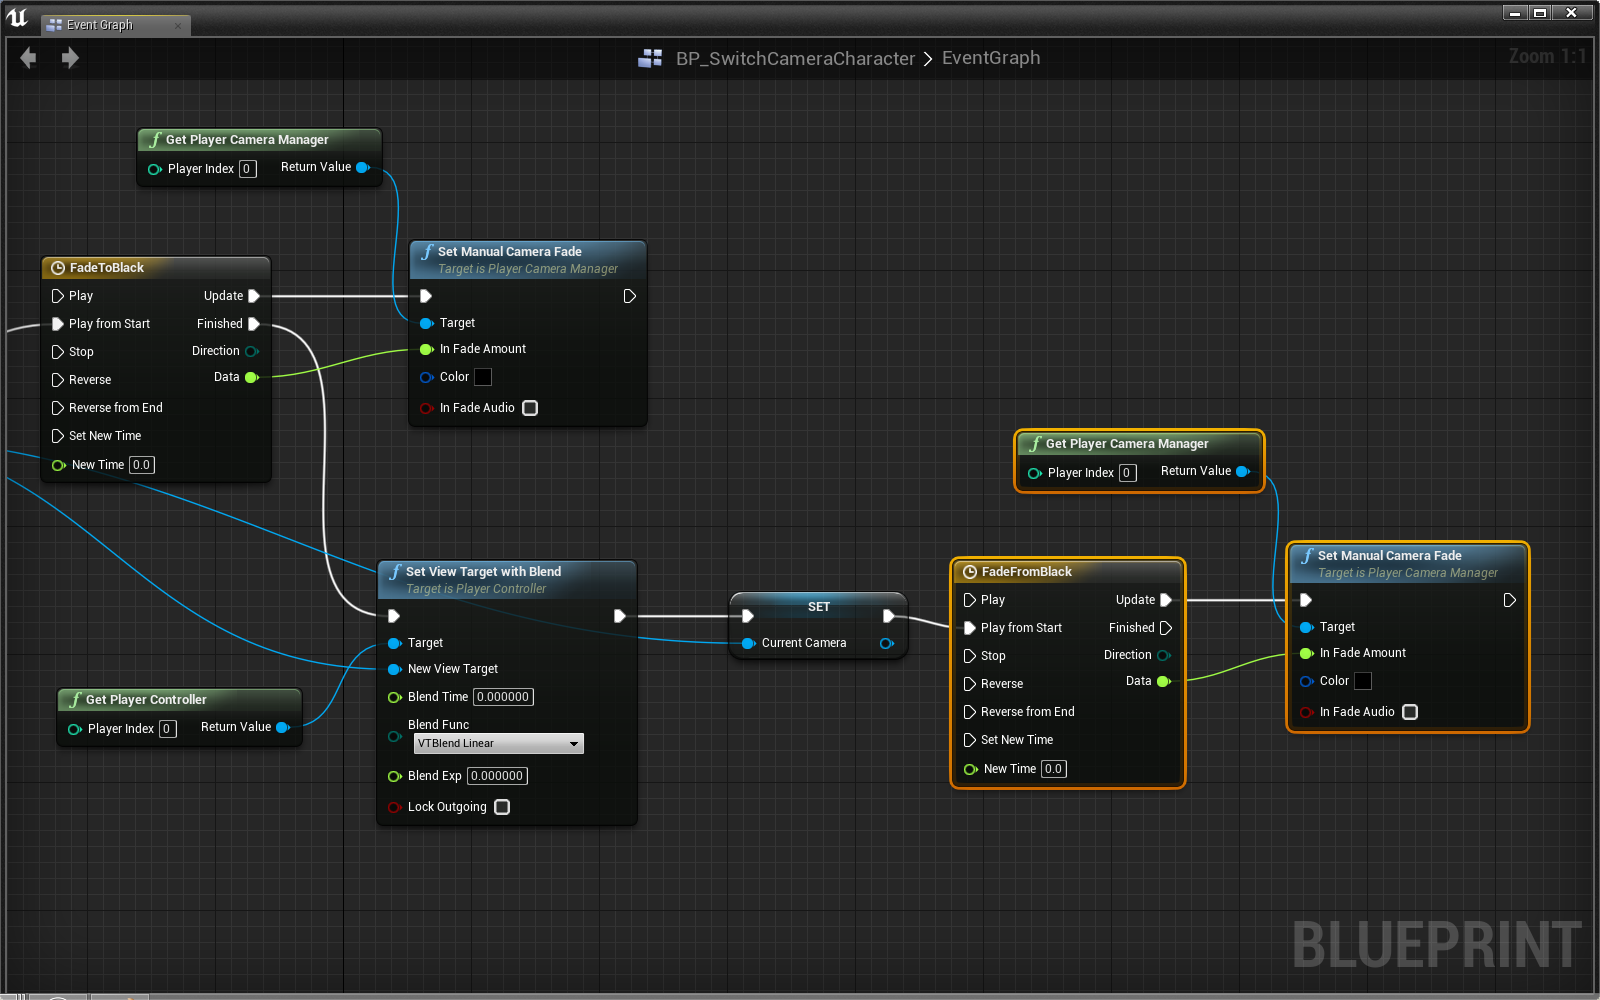
Nosotros at present fade to black, and so switch the camera. All nosotros have to exercise is fade back in!
Challenge:
Using the same techniques nosotros used to fade the photographic camera to black, write some code to fade the camera dorsum in after switching to the new view target.
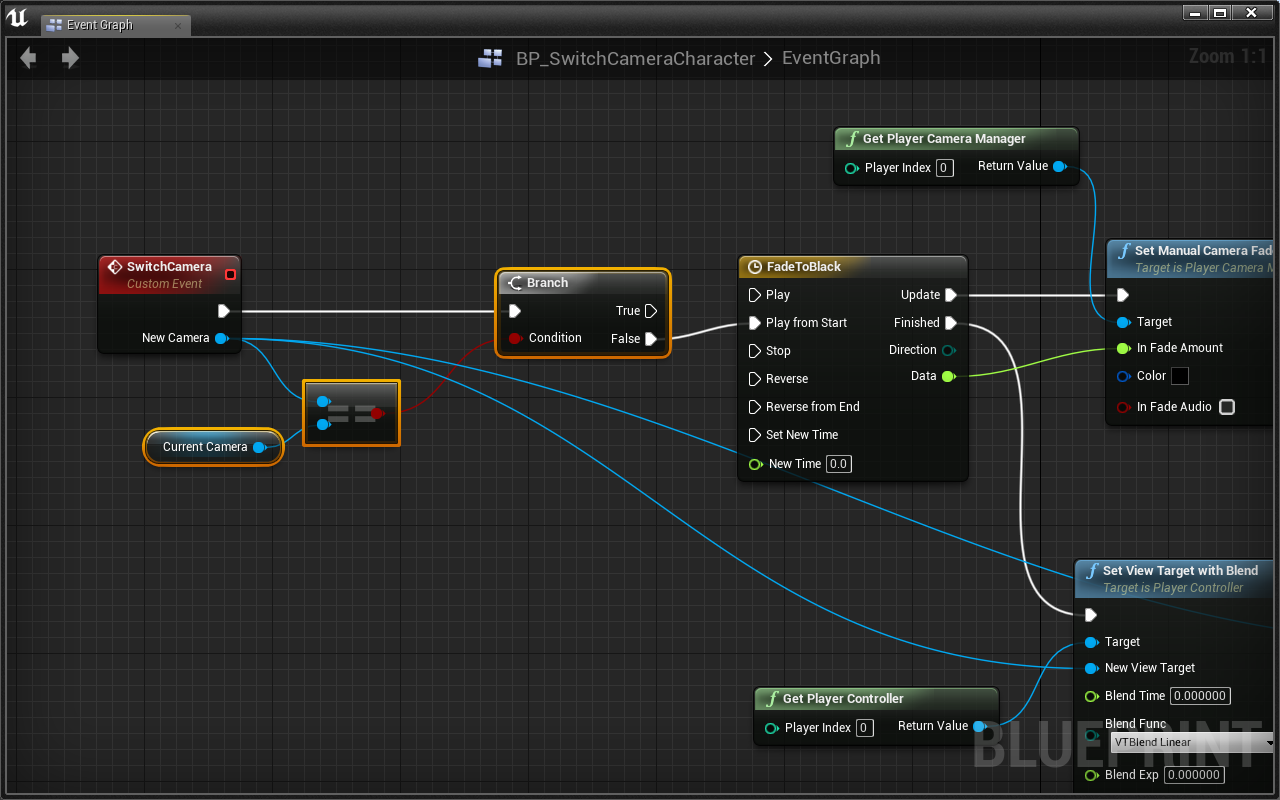
Our photographic camera transition is functional, just there'southward a bug hidden here.
First, if SwitchCamera attempts to switch us to the same camera, nosotros'll fade in/out for no reason.
Challenge:
Insert a Branch in front of everything that checks whether or not CurrentCamera is equal to SwitchCamera > New Photographic camera using ==. If it is, don't do anything.
2nd, when we first start the game, we fade out from some unknown photographic camera (it is in fact the role player'southward default camera), and then fade back in to the one we want to start on. Allow's skip the undesired fade out from unknown camera at the beginning.
The all-time fashion to skip the unwanted behavior is to check if the have a CurrentCamera. At the very commencement of the game, we don't accept a CurrentCamera and tin can thus choose to skip the fade to blackness and leap straight to switching cameras and fading in.
We can check if we have a CurrentCamera using the Is Valid? node.
- Pull a wire from Co-operative > False and place a Is Valid? node
- Connect a reference to CurrentCamera to Is Valid > Input Object.
If the CurrentCamera Is Valid, nosotros should continue on as normal. Otherwise, we should skip the fading part and jump right to Set View Target with Blend.
- Is Valid > Is Valid FadeToBlack
- Is Valid > Is Non Valid Set View Target with Blend
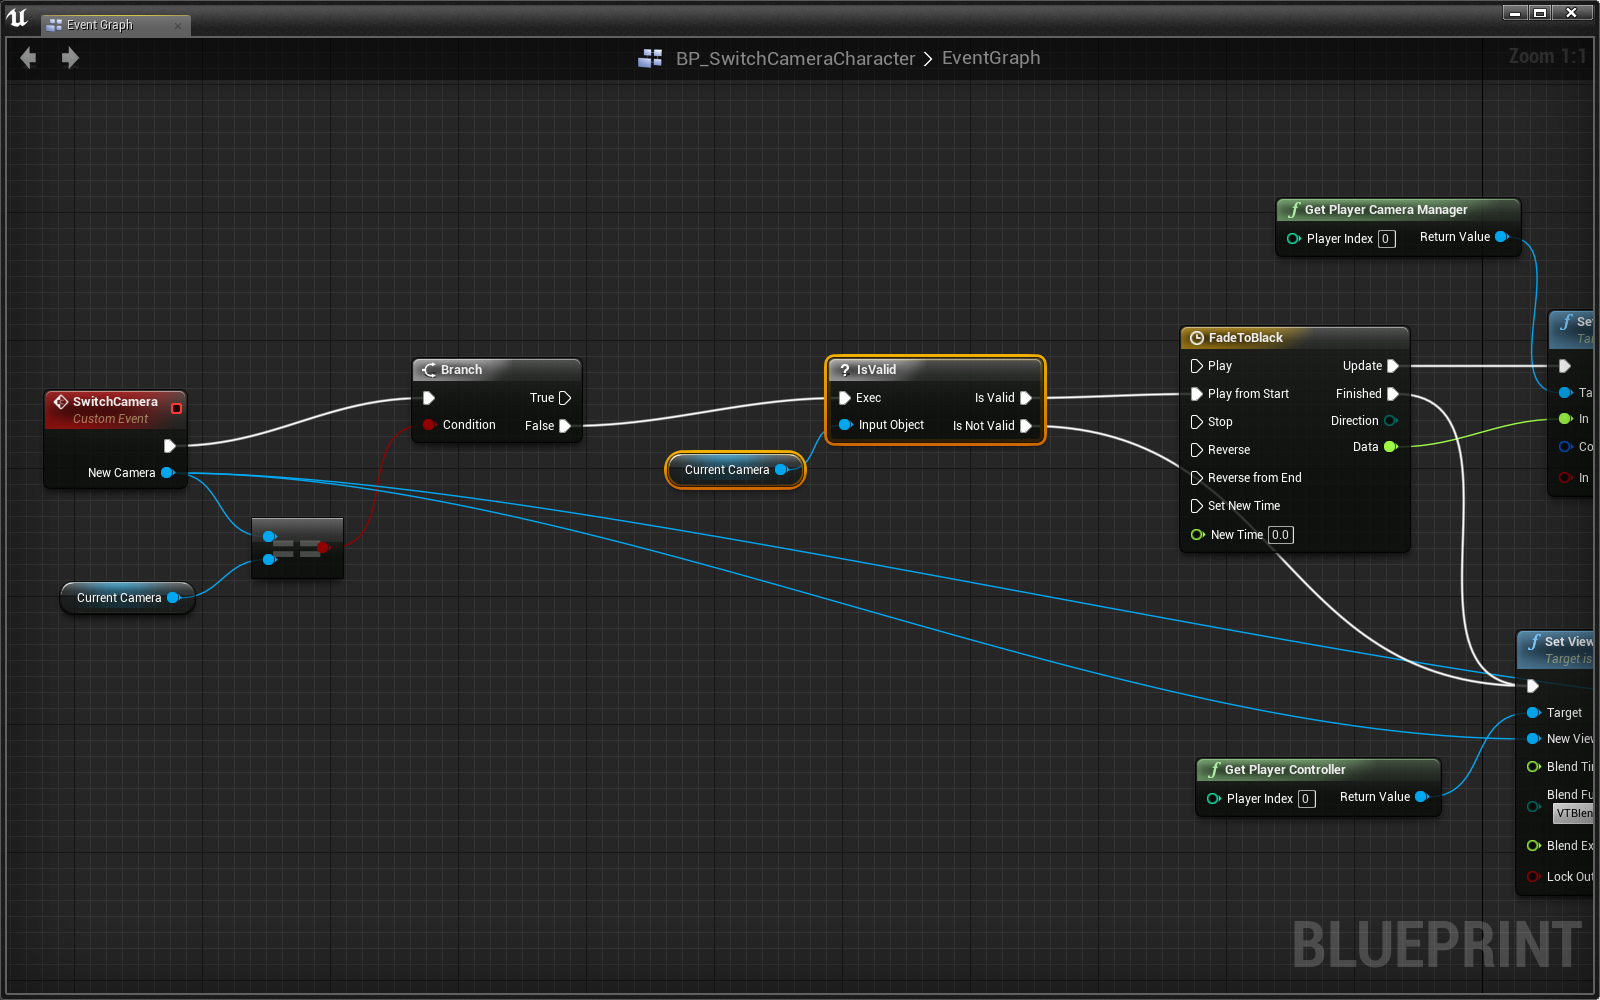
Go alee and printing that Play push button! The fading should work perfectly.
Effective utilise of this character-camera human relationship requires conscientious level design and practiced photographic camera/trigger placement. Be thoughtful!
A Note On Controls
You may have noticed that the controls aren't entirely intuitive, and definitely don't feel neat when you switch cameras. At that place are a number of ways to improve the command scheme of this perspective, and with some tweaking, you lot can have information technology working exactly as you want. We'll go out the implementation upwards to yous.
Switching Levels
You lot now accept 4 great locomotion/perspective demos. We're going to take this every bit an opportunity to larn about loading new levels. By the end, you'll exist able to demo each map in ane playthrough. To practice this, we'll put a "portal" at the cease of each map that links each map together.
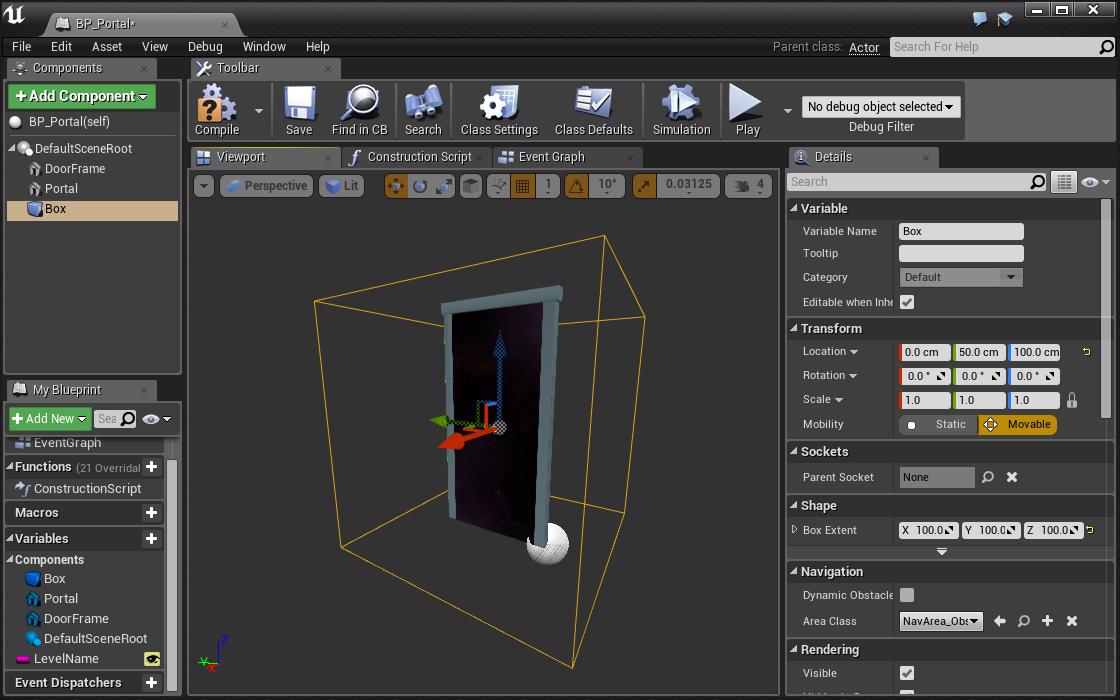
BP_Portal
We've prepare up a blueprint in Lessons > Lesson4 chosen BP_Portal. Information technology is currently just some static meshes and a public variable. Permit's make this portal load the next level for united states of america when our graphic symbol gets close.
- Open BP_Portal in Lessons > Lesson4
We first need to add together a collision box that will fire an overlap event when our player gets close.
- Add together a Box Collision component
- Ready Location to [0, fifty, 100]
- Set Box Extent to [100, 100, 100]
This Box Collision tin can exist used to fire an overlap consequence whenever our player collides with it. This is how nosotros'll know when to switch levels.
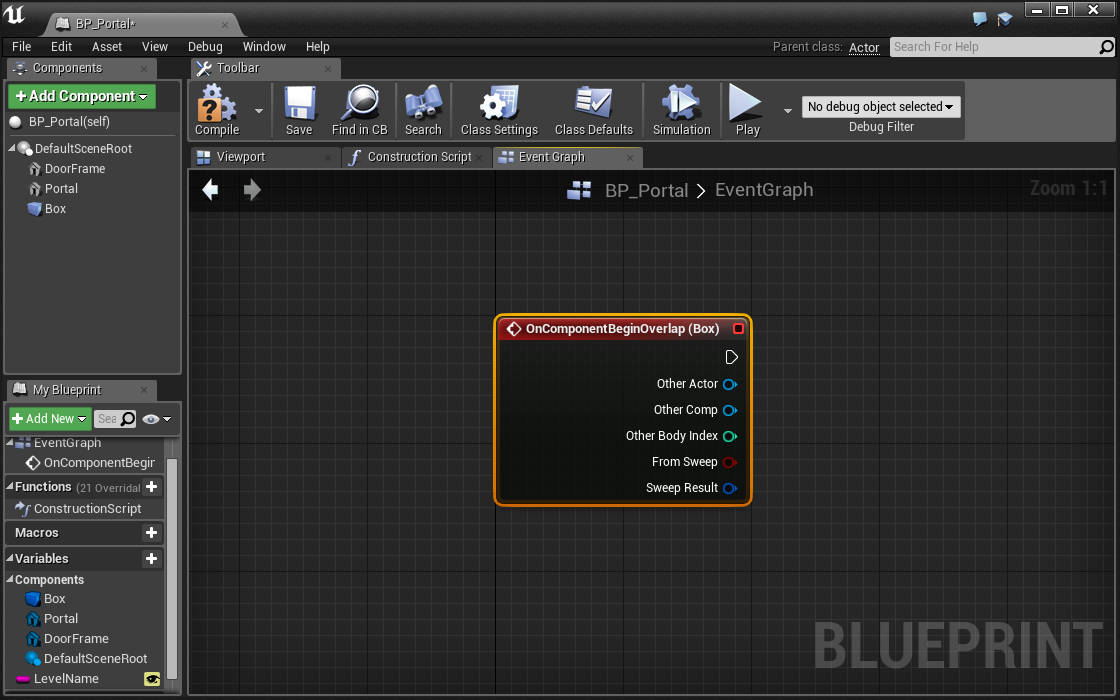
Allow's add together a collision effect specific to our Box Collision component:
- Correct click the Box component
- Select Add together Result > Add OnComponentBeginOverlap
A new issue was added to our consequence graph! This event will merely fire when the Box component is collided with.
Using collision components similar our Box Collision is an extremely powerful scripting blueprint in UE4. You'll find that you use information technology all the time to trigger events and behaviors.
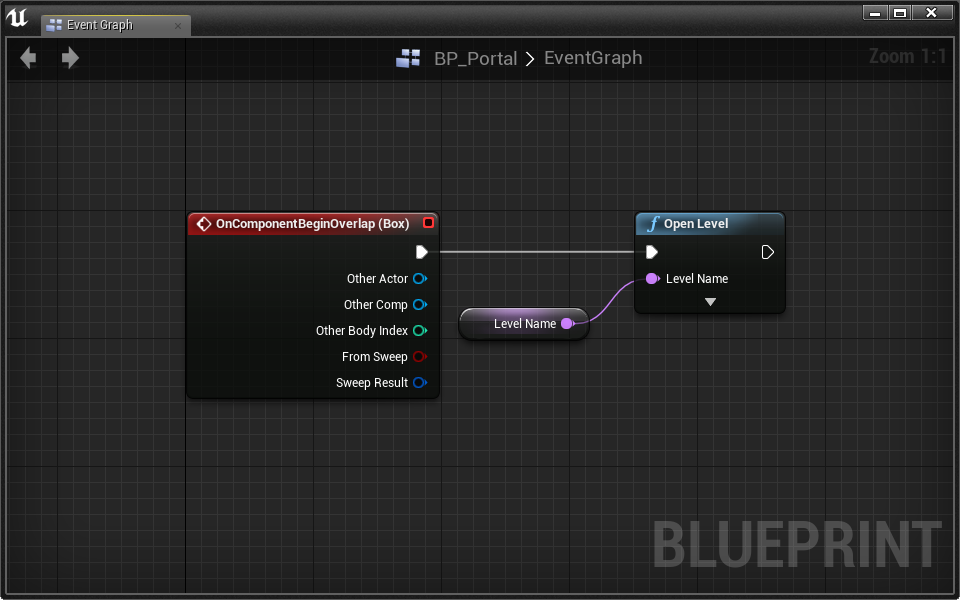
When the Box is collided with, we want to open the new level. To do that, we use the Open Level node.
- OnComponentBeginOverlap (Box) Open Level
The Open Level node has a Level Name input. Here we're going to use the BP_Portal'south public variable LevelName as its imput. Now we tin can reuse the BP_Portal, no thing what level we desire to load.
- Get a reference to LevelName
- LevelName Open Level > Level Proper noun
Now let's test out our portal:
- Open the FirstPerson map
- Place the portal at the stop of the level
- Set up the portal's Level Proper name to PointAndClick in the Details panel
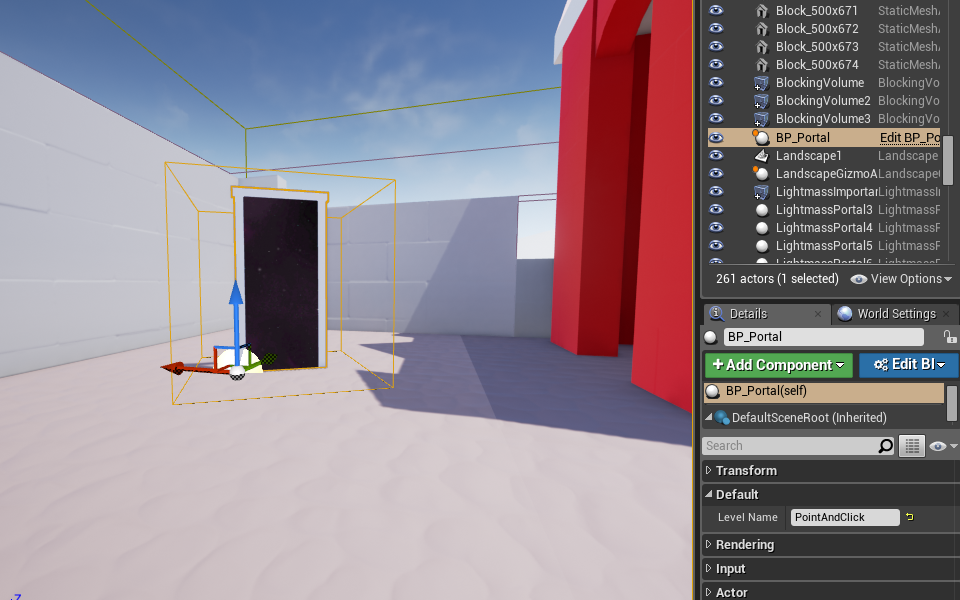
Press Play and examination it out!
Nice! At present y'all can add the portal to PointAndClick and 25D. Just make sure each portal points to the adjacent level.
One thing y'all may find is that when we switch levels, the engine tends to lag as information technology loads up the new files. A laggy HMD is a not bad way to make your histrion nauseas. To fix this, we should fade out, and so dorsum in, just like nosotros did with the Stationary Cameras.
Fading Betwixt Levels
In Stationary Cameras, we faded our camera out using a Timeline and the Set Transmission Camera Fade node. Rather than using a Timeline, let's use UE4'south congenital in Outset Camera Fade node.
- Open BP_Portal
Permit's add together the code to fade out before opening the new level:
- Place a Get Player Camera Manager node
- Pull out a wire and place the Beginning Camera Fade node
- Prepare From Alpha to 0
- Set To Alpha to 1
- Set Elapsing to one
- Check Concord When Finished
- OnComponentBeginOverlap (Box) Showtime Photographic camera Fade
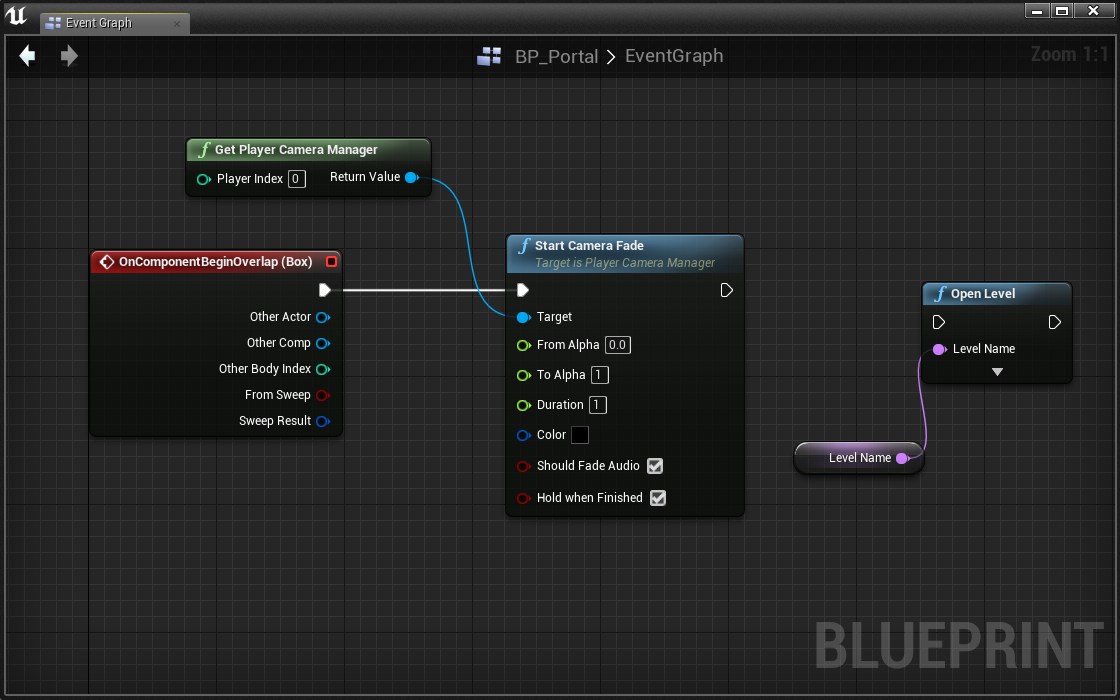
The Start Photographic camera Fade node does non block until it's finished. For this reason, we have to employ a Delay node to wait until the fade finishes, so switch levels using Open Level
Challenge:
Use a Delay node to look for the camera fade to finish. Then switch levels using Open up Level.
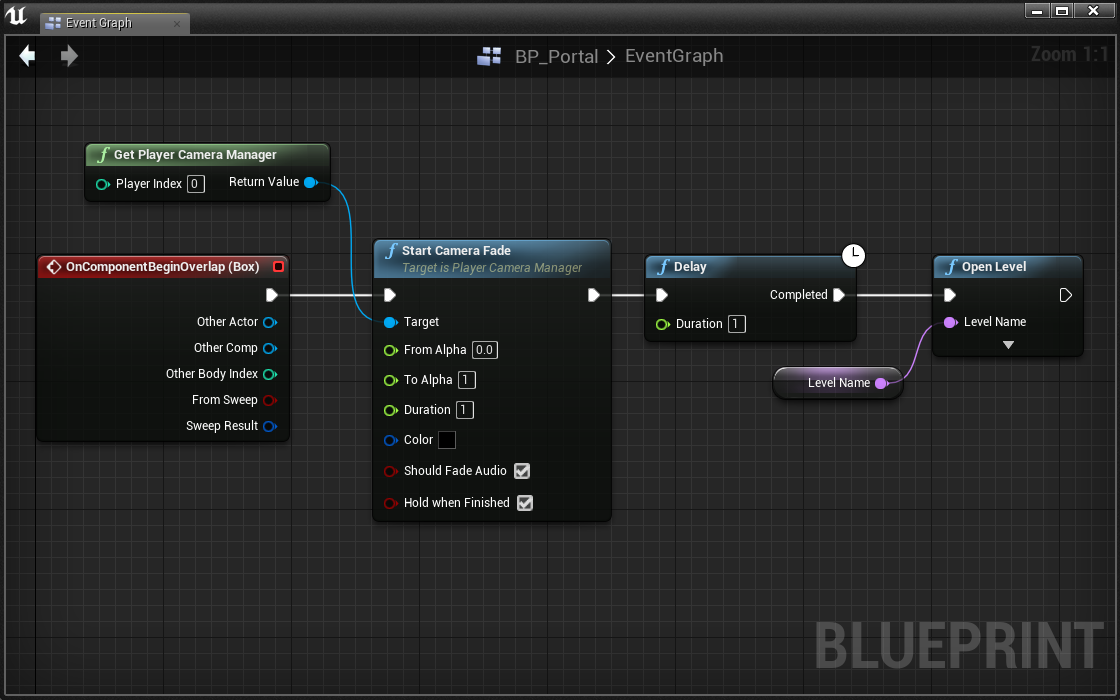
Marvelous! At present when we switch levels the electric current globe fades out before switching to the new map. One problem, the new level needs to fade in!
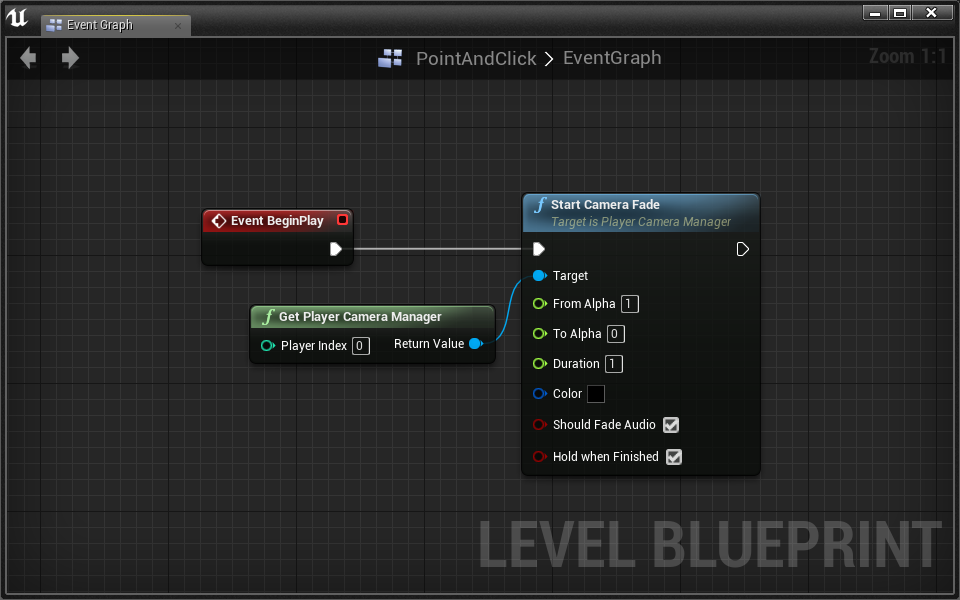
Challenge:
Using the Level Blueprint of each level, fade the camera in on Begin Play.
There information technology is! All your levels should at present link upward and seamlessly fade between each other one time you attain the portal at the cease.
Conclusion
We've created iv characters with unique character-photographic camera relationships. Some of these characters are more VR-friendly than others, but each has its advantages and disadvantages. VR is a vast and largely unexplored borderland. Our guidelines are simply suggestions. This is your opportunity to experiment and innovate.
To read more than on suggested VR practices, check out the Oculus Documentation.
In UE4, you now take the skills to:
- Create a grapheme that moves using the CharacterMovement component
- Use your mouse in game to interact with a 3D globe
- Possess external cameras for Third Person experiences
- Experiment with dissimilar types of locomotion and perspective
- Employ collision components to define overlap triggers
- Alter levels
- Fade the photographic camera in and out

Source: https://layoutvr.github.io/learn/core_4_new.html
Posted by: johnsonprowelly.blogspot.com
0 Response to "How To Use Spring Arm Camera"
Post a Comment